Dell B2375dfw Dell Mono MFP User's Guide - Page 217
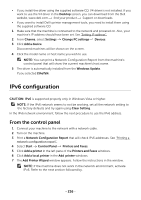
IPv6 configuration, From the control panel
 |
View all Dell B2375dfw manuals
Add to My Manuals
Save this manual to your list of manuals |
Page 217 highlights
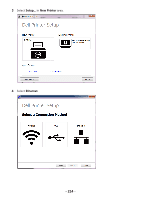
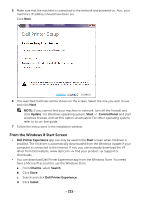
• If you install the driver using the supplied software CD, V4 driver is not installed. If you want to use the V4 driver in the Desktop screen, you can download from the Dell website, www.dell.com find your product Support or downloads. • If you want to install Dell's printer management tools, you need to install them using the supplied software CD. 1 Make sure that the machine is connected to the network and powered on. Also, your machine's IP address should have been set. See "Setting IP address". 2 From Charms, select Settings Change PC settings Devices. 3 Click Add a device. Discovered machines will be shown on the screen. 4 Click the model name or host name you wish to use. NOTE: You can print a Network Configuration Report from the machine's control panel that will show the current machine's host name. 5 The driver is automatically installed from the Windows Update. If you selected EtheTalk. IPv6 configuration CAUTION: IPv6 is supported properly only in Windows Vista or higher. NOTE: If the IPv6 network seems to not be working, set all the network setting to the factory defaults and try again using Clear Setting. In the IPv6 network environment, follow the next procedure to use the IPv6 address. From the control panel 1 Connect your machine to the network with a network cable. 2 Turn on the machine. 3 Print a Network Configuration Report that will check IPv6 addresses. See "Printing a network configuration report". 4 Select Start Control Panel Printers and Faxes. 5 Click Add a printer in the left pane of the Printers and Faxes windows. 6 Click Add a local printer in the Add printer windows. 7 The Add Printer Wizard window appears. Follow the instructions in the window. NOTE: If the machine does not work in the network environment, activate IPv6. Refer to the next section followed by. - 216
-
 1
1 -
2
-
3
-
4
-
5
-
6
-
7
-
8
-
9
-
10
-
11
-
12
-
13
-
14
-
15
-
16
-
17
-
18
-
19
-
20
-
21
-
22
-
23
-
24
-
25
-
26
-
27
-
28
-
29
-
30
-
31
-
32
-
33
-
34
-
35
-
36
-
37
-
38
-
39
-
40
-
41
-
42
-
43
-
44
-
45
-
46
-
47
-
48
-
49
-
50
-
51
-
52
-
53
-
54
-
55
-
56
-
57
-
58
-
59
-
60
-
61
-
62
-
63
-
64
-
65
-
66
-
67
-
68
-
69
-
70
-
71
-
72
-
73
-
74
-
75
-
76
-
77
-
78
-
79
-
80
-
81
-
82
-
83
-
84
-
85
-
86
-
87
-
88
-
89
-
90
-
91
-
92
-
93
-
94
-
95
-
96
-
97
-
98
-
99
-
100
-
101
-
102
-
103
-
104
-
105
-
106
-
107
-
108
-
109
-
110
-
111
-
112
-
113
-
114
-
115
-
116
-
117
-
118
-
119
-
120
-
121
-
122
-
123
-
124
-
125
-
126
-
127
-
128
-
129
-
130
-
131
-
132
-
133
-
134
-
135
-
136
-
137
-
138
-
139
-
140
-
141
-
142
-
143
-
144
-
145
-
146
-
147
-
148
-
149
-
150
-
151
-
152
-
153
-
154
-
155
-
156
-
157
-
158
-
159
-
160
-
161
-
162
-
163
-
164
-
165
-
166
-
167
-
168
-
169
-
170
-
171
-
172
-
173
-
174
-
175
-
176
-
177
-
178
-
179
-
180
-
181
-
182
-
183
-
184
-
185
-
186
-
187
-
188
-
189
-
190
-
191
-
192
-
193
-
194
-
195
-
196
-
197
-
198
-
199
-
200
-
201
-
202
-
203
-
204
-
205
-
206
-
207
-
208
-
209
-
210
-
211
-
 212
212 -
 213
213 -
 214
214 -
 215
215 -
 216
216 -
 217
217 -
 218
218 -
 219
219 -
 220
220 -
 221
221 -
 222
222 -
223
-
224
-
225
-
226
-
227
-
228
-
229
-
230
-
231
-
232
-
233
-
234
-
235
-
236
-
237
-
238
-
239
-
240
-
241
-
242
-
243
-
244
-
245
-
246
-
247
-
248
-
249
-
250
-
251
-
252
-
253
-
254
-
255
-
256
-
257
-
258
-
259
-
260
-
261
-
262
-
263
-
264
-
265
-
266
-
267
-
268
-
269
-
270
-
271
-
272
-
273
-
274
-
275
-
276
-
277
-
278
-
279
-
280
-
281
-
282
-
283
-
284
-
285
-
286
-
287
-
288
-
289
-
290
-
291
-
292
-
293
-
294
-
295
-
296
-
297
-
298
-
299
-
300
-
301
-
302
-
303
-
304
-
305
-
306
-
307
-
308
-
309
-
310
-
311
-
312
-
313
-
314
-
315
-
316
-
317
-
318
-
319
-
320
-
321
-
322
-
323
-
324
-
325
-
326
-
327
-
328
-
329
-
330
-
331
-
332
-
333
-
334
-
335
-
336
-
337
-
338
-
339
-
340
-
341
-
342
-
343
-
344
-
345
-
346
-
347
-
348
-
349
-
350
-
351
-
352
-
353
-
354
-
355
-
356
-
357
-
358
-
359
 |
 |