Dell PowerEdge C6400 EMC Installation and Service Manual - Page 71
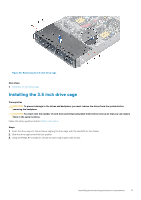
Installing the 3.5 inch drive cage
 |
View all Dell PowerEdge C6400 manuals
Add to My Manuals
Save this manual to your list of manuals |
Page 71 highlights
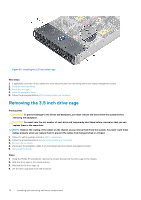
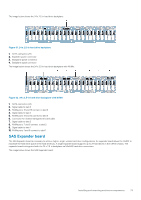
Figure 58. Removing the 3.5-inch drive cage Next steps 1. Install the 3.5-inch drive cage. Installing the 3.5 inch drive cage Prerequisites CAUTION: To prevent damage to the drives and backplane, you must remove the drives from the system before removing the backplane. CAUTION: You must note the number of each drive and temporarily label them before removal so that you can replace them in the same locations. Follow the safety guidelines listed in Safety instructions. Steps 1. Insert the drive cage into the enclosure, aligning the drive cage with the standoffs on the chassis. 2. Slide the drive cage toward the lock position. 3. Using the Phillips #1 screwdriver, secure the drive cage in place with screws. Installing and removing enclosure components 71
-
 1
1 -
2
-
3
-
4
-
5
-
6
-
7
-
8
-
9
-
10
-
11
-
12
-
13
-
14
-
15
-
16
-
17
-
18
-
19
-
20
-
21
-
22
-
23
-
24
-
25
-
26
-
27
-
28
-
29
-
30
-
31
-
32
-
33
-
34
-
35
-
36
-
37
-
38
-
39
-
40
-
41
-
42
-
43
-
44
-
45
-
46
-
47
-
48
-
49
-
50
-
51
-
52
-
53
-
54
-
55
-
56
-
57
-
58
-
59
-
60
-
61
-
62
-
63
-
64
-
65
-
 66
66 -
 67
67 -
 68
68 -
 69
69 -
 70
70 -
 71
71 -
 72
72 -
 73
73 -
 74
74 -
 75
75 -
 76
76 -
77
-
78
-
79
-
80
-
81
-
82
-
83
-
84
-
85
-
86
-
87
-
88
 |
 |
