Dell PowerEdge MX840c EMC PowerEdge MX840c Installation and Service Manual - Page 120
Installing the system board, Do not lift the system board by holding a memory module, processor
 |
View all Dell PowerEdge MX840c manuals
Add to My Manuals
Save this manual to your list of manuals |
Page 120 highlights
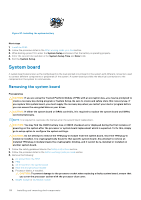
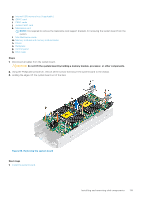
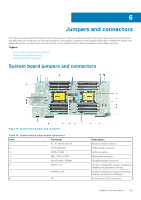
Installing the system board Prerequisites 1. Follow the safety guidelines listed in the Safety instructions section. 2. Follow the procedure listed in the Before working inside your sled section. CAUTION: If either the system board or iDRAC card fails, it is required to replace the system board and iDRAC card simultaneously. NOTE: It is required to reactivate the licenses after the system board replacement. Steps 1. Unpack the replacement system board assembly. CAUTION: Do not lift the system board by holding a memory module, processor, or other components. 2. Holding the system board by the edges, place the system board into the sled. 3. Using the Phillips #2 screwdriver, secure the system board to the chassis with the screws. Figure 89. Installing the system board Next steps 1. Replace the following: a. TPM NOTE: The TPM module needs to be replaced only while installing a new system board. b. IDSDM module or M.2 BOSS module c. Internal USB memory key (if applicable) d. iDRAC card e. PERC cards f. Jumbo PERC cards 120 Installing and removing sled components
-
 1
1 -
2
-
3
-
4
-
5
-
6
-
7
-
8
-
9
-
10
-
11
-
12
-
13
-
14
-
15
-
16
-
17
-
18
-
19
-
20
-
21
-
22
-
23
-
24
-
25
-
26
-
27
-
28
-
29
-
30
-
31
-
32
-
33
-
34
-
35
-
36
-
37
-
38
-
39
-
40
-
41
-
42
-
43
-
44
-
45
-
46
-
47
-
48
-
49
-
50
-
51
-
52
-
53
-
54
-
55
-
56
-
57
-
58
-
59
-
60
-
61
-
62
-
63
-
64
-
65
-
66
-
67
-
68
-
69
-
70
-
71
-
72
-
73
-
74
-
75
-
76
-
77
-
78
-
79
-
80
-
81
-
82
-
83
-
84
-
85
-
86
-
87
-
88
-
89
-
90
-
91
-
92
-
93
-
94
-
95
-
96
-
97
-
98
-
99
-
100
-
101
-
102
-
103
-
104
-
105
-
106
-
107
-
108
-
109
-
110
-
111
-
112
-
113
-
114
-
 115
115 -
 116
116 -
 117
117 -
 118
118 -
 119
119 -
 120
120 -
 121
121 -
 122
122 -
 123
123 -
 124
124 -
 125
125 -
126
-
127
-
128
-
129
-
130
-
131
-
132
-
133
-
134
-
135
-
136
-
137
-
138
-
139
-
140
-
141
-
142
-
143
 |
 |
