Dell PowerEdge MX840c EMC PowerEdge MX840c Installation and Service Manual - Page 128
Steps, Remove the PEM
 |
View all Dell PowerEdge MX840c manuals
Add to My Manuals
Save this manual to your list of manuals |
Page 128 highlights
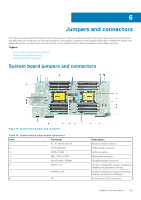
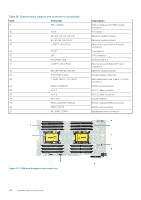
Steps 1. Remove the sled from the enclosure. 2. Remove the sled cover. 3. Remove the PEM. 4. Remove the drive cage. 5. Move the jumper on the system board jumper from pins 2 and 4 to pins 4 and 6. 6. Install the drive cage. 7. Install the PEM. 8. Install the sled cover. The existing passwords are not disabled (erased) until the system boots with the jumper on pins 4 and 6. However, before you assign a new system and/or setup password, you must move the jumper back to pins 2 and 4. NOTE: If you assign a new system and/or setup password with the jumper on pins 4 and 6, the system disables the new password(s) the next time it boots. 9. Install the sled into the enclosure. 10. Remove the sled from the enclosure. 11. Remove the sled cover. 12. Remove the PEM. 13. Remove the drive cage. 14. Move the jumper on the system board jumper from pins 4 and 6 to pins 2 and 4. 15. Install the drive cage. 16. Install the PEM. 17. Install the sled cover. 18. Install the sled into the enclosure. 19. Assign a new system and/or setup password. 128 Jumpers and connectors
-
 1
1 -
2
-
3
-
4
-
5
-
6
-
7
-
8
-
9
-
10
-
11
-
12
-
13
-
14
-
15
-
16
-
17
-
18
-
19
-
20
-
21
-
22
-
23
-
24
-
25
-
26
-
27
-
28
-
29
-
30
-
31
-
32
-
33
-
34
-
35
-
36
-
37
-
38
-
39
-
40
-
41
-
42
-
43
-
44
-
45
-
46
-
47
-
48
-
49
-
50
-
51
-
52
-
53
-
54
-
55
-
56
-
57
-
58
-
59
-
60
-
61
-
62
-
63
-
64
-
65
-
66
-
67
-
68
-
69
-
70
-
71
-
72
-
73
-
74
-
75
-
76
-
77
-
78
-
79
-
80
-
81
-
82
-
83
-
84
-
85
-
86
-
87
-
88
-
89
-
90
-
91
-
92
-
93
-
94
-
95
-
96
-
97
-
98
-
99
-
100
-
101
-
102
-
103
-
104
-
105
-
106
-
107
-
108
-
109
-
110
-
111
-
112
-
113
-
114
-
115
-
116
-
117
-
118
-
119
-
120
-
121
-
122
-
 123
123 -
 124
124 -
 125
125 -
 126
126 -
 127
127 -
 128
128 -
 129
129 -
 130
130 -
 131
131 -
 132
132 -
 133
133 -
134
-
135
-
136
-
137
-
138
-
139
-
140
-
141
-
142
-
143
 |
 |
