Dell PowerEdge R250 EMC Installation and Service Manual - Page 68
Removing the system battery, To avoid damage to the battery connector
 |
View all Dell PowerEdge R250 manuals
Add to My Manuals
Save this manual to your list of manuals |
Page 68 highlights
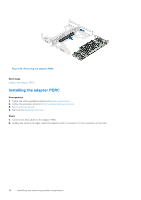
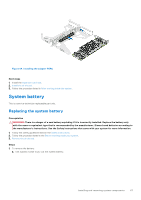
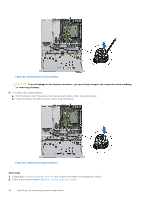
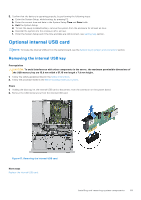
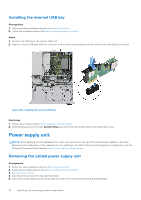
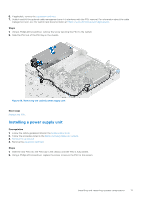
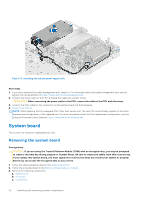
Figure 65. Removing the system battery CAUTION: To avoid damage to the battery connector, you must firmly support the connector while installing or removing a battery. 2. To install a new system battery: a. Hold the battery with the positive side facing up and slide it under the securing tabs. b. Press the battery into the connector until it snaps into place. Figure 66. Installing the system battery Next steps 1. If applicable, install the expansion card riser and connect the cables to the expansion card(s). 2. Follow the procedure listed in the After working inside your system. 68 Installing and removing system components
-
 1
1 -
2
-
3
-
4
-
5
-
6
-
7
-
8
-
9
-
10
-
11
-
12
-
13
-
14
-
15
-
16
-
17
-
18
-
19
-
20
-
21
-
22
-
23
-
24
-
25
-
26
-
27
-
28
-
29
-
30
-
31
-
32
-
33
-
34
-
35
-
36
-
37
-
38
-
39
-
40
-
41
-
42
-
43
-
44
-
45
-
46
-
47
-
48
-
49
-
50
-
51
-
52
-
53
-
54
-
55
-
56
-
57
-
58
-
59
-
60
-
61
-
62
-
 63
63 -
 64
64 -
 65
65 -
 66
66 -
 67
67 -
 68
68 -
 69
69 -
 70
70 -
 71
71 -
 72
72 -
 73
73 -
74
-
75
-
76
-
77
-
78
-
79
-
80
-
81
-
82
-
83
-
84
-
85
-
86
-
87
-
88
-
89
-
90
 |
 |

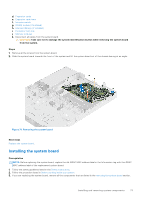
Figure 65. Removing the system battery
CAUTION:
To avoid damage to the battery connector, you must firmly support the connector while installing
or removing a battery.
2.
To install a new system battery:
a.
Hold the battery with the positive side facing up and slide it under the securing tabs.
b.
Press the battery into the connector until it snaps into place.
Figure 66. Installing the system battery
Next steps
1.
If applicable,
install the expansion card riser
and connect the cables to the expansion card(s).
2.
Follow the procedure listed in the
After working inside your system
.
68
Installing and removing system components