Dell PowerEdge R250 EMC Installation and Service Manual - Page 71
Installing a power supply unit, Steps, Next steps, Prerequisites
 |
View all Dell PowerEdge R250 manuals
Add to My Manuals
Save this manual to your list of manuals |
Page 71 highlights
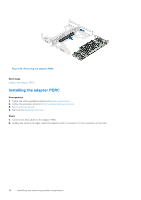
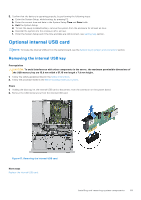
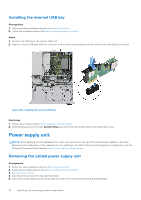
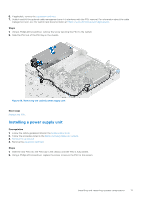
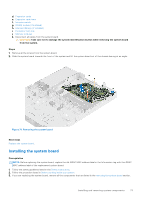
6. If applicable, remove the expansion card riser. 7. Unlatch and lift the optional cable management arm if it interferes with the PSU removal. For information about the cable management arm, see the system rack documentation at https://www.dell.com/poweredgemanuals. Steps 1. Using a Phillips #2 screwdriver, remove the screw securing the PSU to the system. 2. Slide the PSU out of the PSU bay in the chassis. Figure 69. Removing the cabled power supply unit Next steps Replace the PSU. Installing a power supply unit Prerequisites 1. Follow the safety guidelines listed in the Safety instructions. 2. Follow the procedure listed in the Before working inside your system. 3. Remove the air shroud. 4. Remove the expansion card riser. Steps 1. Slide the new PSU into the PSU bay in the chassis until the PSU is fully seated. 2. Using a Phillips #2 screwdriver, replace the screw to secure the PSU to the system. Installing and removing system components 71
-
 1
1 -
2
-
3
-
4
-
5
-
6
-
7
-
8
-
9
-
10
-
11
-
12
-
13
-
14
-
15
-
16
-
17
-
18
-
19
-
20
-
21
-
22
-
23
-
24
-
25
-
26
-
27
-
28
-
29
-
30
-
31
-
32
-
33
-
34
-
35
-
36
-
37
-
38
-
39
-
40
-
41
-
42
-
43
-
44
-
45
-
46
-
47
-
48
-
49
-
50
-
51
-
52
-
53
-
54
-
55
-
56
-
57
-
58
-
59
-
60
-
61
-
62
-
63
-
64
-
65
-
 66
66 -
 67
67 -
 68
68 -
 69
69 -
 70
70 -
 71
71 -
 72
72 -
 73
73 -
 74
74 -
 75
75 -
 76
76 -
77
-
78
-
79
-
80
-
81
-
82
-
83
-
84
-
85
-
86
-
87
-
88
-
89
-
90
 |
 |
