Dell PowerEdge R250 EMC Installation and Service Manual - Page 8
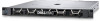
Rear view of the system
 |
View all Dell PowerEdge R250 manuals
Add to My Manuals
Save this manual to your list of manuals |
Page 8 highlights
Table 1. Features available on the front of the system Item Ports, panels, and slots Icon Description 1 Left control panel N/A Contains the system health, and system ID. 2 Optical drive N/A One optional slim SATA DVD-ROM drive or DVD+/-RW drive. 3 Drive N/A Enables you to install drives that are supported on your system. 4 Right control panel N/A Contains the power button, USB port, iDRAC Direct micro port, and the iDRAC Direct status LED. 5 Information tag N/A The Information tag is a slide-out label panel that contains system information such as Service Tag, NIC, MAC address, and so on. If you have opted for the secure default access to iDRAC, the Information tag also contains the iDRAC secure default password. NOTE: For more information, see the Dell EMC PowerEdge R250 Technical Specifications on the product documentation page. Rear view of the system Figure 4. Rear view of the system Table 2. Rear view of the system Item Ports, panels, or slots Icon 1 Serial port N/a 2 Ethernet ports 3 PCIe expansion card slot 1 N/a 4 PCIe expansion card slot N/a 2 5 Cabled power supply unit 6 CMA jack N/a 7 System ID button 8 PowerEdge R250 system overview Description Enables you to connect serail devices to the system. The Ethernet ports that are integrated on the system board provide network connectivity. These NIC ports can also be shared with iDRAC when iDRAC network settings is set to shared mode. Enables you to connect PCI Express expansion cards. Enables you to connect PCI Express expansion cards. Indicates the PSU. Enables you to connect to cable management arm LED Press the system ID button: ● To locate a particular system within a rack.
-
 1
1 -
2
-
 3
3 -
 4
4 -
 5
5 -
 6
6 -
 7
7 -
 8
8 -
 9
9 -
 10
10 -
 11
11 -
 12
12 -
 13
13 -
14
-
15
-
16
-
17
-
18
-
19
-
20
-
21
-
22
-
23
-
24
-
25
-
26
-
27
-
28
-
29
-
30
-
31
-
32
-
33
-
34
-
35
-
36
-
37
-
38
-
39
-
40
-
41
-
42
-
43
-
44
-
45
-
46
-
47
-
48
-
49
-
50
-
51
-
52
-
53
-
54
-
55
-
56
-
57
-
58
-
59
-
60
-
61
-
62
-
63
-
64
-
65
-
66
-
67
-
68
-
69
-
70
-
71
-
72
-
73
-
74
-
75
-
76
-
77
-
78
-
79
-
80
-
81
-
82
-
83
-
84
-
85
-
86
-
87
-
88
-
89
-
90
 |
 |
