Epson 30000 User Manual - Page 26
Connecting the SCSI Cable to Your Computer, cable is secure when both connector locks
 |
UPC - 010343832800
View all Epson 30000 manuals
Add to My Manuals
Save this manual to your list of manuals |
Page 26 highlights
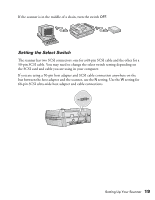
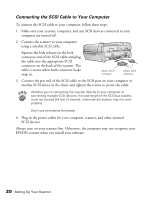
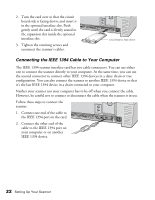
Connecting the SCSI Cable to Your Computer To connect the SCSI cable to your computer, follow these steps: 1. Make sure your scanner, computer, and any SCSI devices connected to your computer are turned off. 2. Connect the scanner to your computer using a suitable SCSI cable. Squeeze the lock releases on the lock connector end of the SCSI cable and plug the cable into the appropriate SCSI connector on the back of the scanner. The cable is secure when both connector locks snap in. 68-pin SCSI interface 50-pin SCSI interface 3. Connect the pin end of the SCSI cable to the SCSI port on your computer or another SCSI device in the chain and tighten the screws to secure the cable. Whether you're connecting the scanner directly to your computer or connecting multiple SCSI devices, the total length of the SCSI bus (cables) must not exceed 9.8 feet (3 meters); otherwise the system may not work properly. Don't use an external terminator. 4. Plug in the power cables for your computer, scanner, and other external SCSI devices. Always turn on your scanner first. Otherwise, the computer may not recognize your EPSON scanner when you install your software. 20 Setting Up Your Scanner
-
 1
1 -
2
-
3
-
4
-
5
-
6
-
7
-
8
-
9
-
10
-
11
-
12
-
13
-
14
-
15
-
16
-
17
-
18
-
19
-
20
-
 21
21 -
 22
22 -
 23
23 -
 24
24 -
 25
25 -
 26
26 -
 27
27 -
 28
28 -
 29
29 -
 30
30 -
 31
31 -
32
-
33
-
34
-
35
-
36
-
37
-
38
-
39
-
40
-
41
-
42
-
43
-
44
-
45
-
46
-
47
-
48
-
49
-
50
-
51
-
52
-
53
-
54
-
55
-
56
-
57
-
58
-
59
-
60
-
61
-
62
-
63
-
64
-
65
-
66
-
67
-
68
-
69
-
70
-
71
-
72
-
73
-
74
-
75
-
76
-
77
-
78
-
79
-
80
-
81
-
82
-
83
-
84
-
85
-
86
-
87
-
88
-
89
-
90
-
91
-
92
-
93
-
94
-
95
-
96
-
97
-
98
-
99
-
100
-
101
-
102
-
103
-
104
-
105
-
106
-
107
-
108
-
109
-
110
-
111
-
112
-
113
-
114
-
115
-
116
-
117
-
118
-
119
-
120
-
121
-
122
-
123
-
124
-
125
-
126
-
127
-
128
-
129
-
130
-
131
-
132
-
133
-
134
-
135
-
136
-
137
-
138
-
139
-
140
-
141
-
142
-
143
-
144
-
145
-
146
-
147
-
148
 |
 |
