Epson 30000 User Manual - Page 43
Specify a location, EPSON\English\WIN98, Browse, Finish, Select EPSON GT-30000 on the Devices tab - gt scanner driver for windows 7
 |
UPC - 010343832800
View all Epson 30000 manuals
Add to My Manuals
Save this manual to your list of manuals |
Page 43 highlights
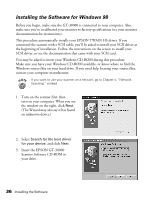
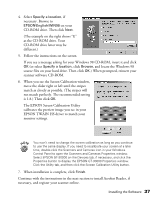
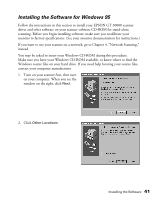
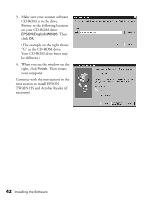
4. Select Specify a location, if necessary. Browse to EPSON\English\WIN98 on your CD-ROM drive. Then click Next. (The example on the right shows "E" as the CD-ROM drive. Your CD-ROM drive letter may be different.) 5. Follow the instructions on the screen. If you see a message asking for your Windows 98 CD-ROM, insert it and click OK (or select Specify a location, click Browse, and locate the Windows 98 source files on your hard drive. Then click OK.) When prompted, reinsert your scanner software CD-ROM. 6. When you see the Screen Calibration window, move the slider right or left until the stripes match as closely as possible. (The stripes will not match perfectly. The recommended setting is 1.8.) Then click OK. The EPSON Screen Calibration Utility calibrates the preview image you see in your EPSON TWAIN HS driver to match your monitor settings. You won't need to change the screen calibration as long as you continue to use the same display. If you need to recalibrate your screen at a later time, double-click the Scanners and Cameras icon in your Windows Control Panel to open the Scanners and Cameras Properties window. Select EPSON GT-30000 on the Devices tab, if necessary, and click the Properties button to display the EPSON GT-30000 Properties window. Click the Utility tab, and then click the Screen Calibration Utility button. 7. When installation is complete, click Finish. Continue with the instructions in the next section to install Acrobat Reader, if necessary, and register your scanner online. Installing the Software 37
-
 1
1 -
2
-
3
-
4
-
5
-
6
-
7
-
8
-
9
-
10
-
11
-
12
-
13
-
14
-
15
-
16
-
17
-
18
-
19
-
20
-
21
-
22
-
23
-
24
-
25
-
26
-
27
-
28
-
29
-
30
-
31
-
32
-
33
-
34
-
35
-
36
-
37
-
 38
38 -
 39
39 -
 40
40 -
 41
41 -
 42
42 -
 43
43 -
 44
44 -
 45
45 -
 46
46 -
 47
47 -
 48
48 -
49
-
50
-
51
-
52
-
53
-
54
-
55
-
56
-
57
-
58
-
59
-
60
-
61
-
62
-
63
-
64
-
65
-
66
-
67
-
68
-
69
-
70
-
71
-
72
-
73
-
74
-
75
-
76
-
77
-
78
-
79
-
80
-
81
-
82
-
83
-
84
-
85
-
86
-
87
-
88
-
89
-
90
-
91
-
92
-
93
-
94
-
95
-
96
-
97
-
98
-
99
-
100
-
101
-
102
-
103
-
104
-
105
-
106
-
107
-
108
-
109
-
110
-
111
-
112
-
113
-
114
-
115
-
116
-
117
-
118
-
119
-
120
-
121
-
122
-
123
-
124
-
125
-
126
-
127
-
128
-
129
-
130
-
131
-
132
-
133
-
134
-
135
-
136
-
137
-
138
-
139
-
140
-
141
-
142
-
143
-
144
-
145
-
146
-
147
-
148
 |
 |
