HP Integrity rx2800 Installation Guide - Page 43
WARNING, CAUTION, To prevent thermal instability and damage to the server, do not separate
 |
View all HP Integrity rx2800 manuals
Add to My Manuals
Save this manual to your list of manuals |
Page 43 highlights
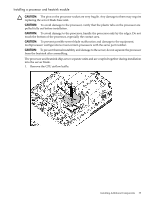
6. Secure the heatsink to the processor a. Slide both plastic locking tabs into place (see callout 1 in the image below). b. Flip the latch down (see callout 2 in the image below). WARNING! The heatsink locking lever can constitute a pinch hazard, keep your hands on top of the lever during installation to avoid personal injury. CAUTION: To prevent thermal instability and damage to the server, do not separate the processor module from the processor's heatsink after they have been coupled. 7. Connect the power cord (see callout 3 in the image above). Installing Additional Components 43
-
 1
1 -
2
-
3
-
4
-
5
-
6
-
7
-
8
-
9
-
10
-
11
-
12
-
13
-
14
-
15
-
16
-
17
-
18
-
19
-
20
-
21
-
22
-
23
-
24
-
25
-
26
-
27
-
28
-
29
-
30
-
31
-
32
-
33
-
34
-
35
-
36
-
37
-
 38
38 -
 39
39 -
 40
40 -
 41
41 -
 42
42 -
 43
43 -
 44
44 -
 45
45 -
 46
46 -
 47
47 -
 48
48 -
49
-
50
-
51
-
52
-
53
-
54
-
55
-
56
-
57
-
58
-
59
-
60
-
61
-
62
-
63
-
64
-
65
-
66
-
67
-
68
-
69
 |
 |

6.
Secure the heatsink to the processor
a.
Slide both plastic locking tabs into place (see callout 1 in the image below).
b.
Flip the latch down (see callout 2 in the image below).
WARNING!
The heatsink locking lever can constitute a pinch hazard, keep your hands
on top of the lever during installation to avoid personal injury.
CAUTION:
To prevent thermal instability and damage to the server, do not separate
the processor module from the processor's heatsink after they have been coupled.
7.
Connect the power cord (see callout 3 in the image above).
Installing Additional Components
43