HP Photosmart A640 User Guide - Page 10
The Photosmart at a glance, Front and rear views - cartridges
 |
View all HP Photosmart A640 manuals
Add to My Manuals
Save this manual to your list of manuals |
Page 10 highlights
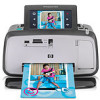
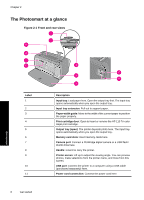
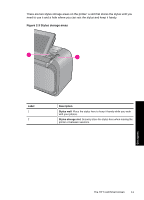
Chapter 2 The Photosmart at a glance Figure 2-1 Front and rear views Get started Label 1 2 3 4 5 6 7 8 9 10 11 8 Get started Description Input tray: Load paper here. Open the output tray first. The input tray opens automatically when you open the output tray. Input tray extension: Pull out to support paper. Paper-width guide: Move to the width of the current paper to position the paper properly. Print cartridge door: Open to insert or remove the HP 110 Tri-color Inkjet print cartridge. Output tray (open): The printer deposits prints here. The input tray opens automatically when you open the output tray. Memory card slots: Insert memory cards here. Camera port: Connect a PictBridge digital camera or a USB flash/ thumb drive here. Handle: Extend to carry the printer. Printer screen: Lift up to adjust the viewing angle. You can preview photos, make selections from the printer menu, and more from this screen. USB port: Connect the printer to a computer using a USB cable (purchased separately) here. Power cord connection: Connect the power cord here.
-
 1
1 -
2
-
3
-
4
-
 5
5 -
 6
6 -
 7
7 -
 8
8 -
 9
9 -
 10
10 -
 11
11 -
 12
12 -
 13
13 -
 14
14 -
 15
15 -
16
-
17
-
18
-
19
-
20
-
21
-
22
-
23
-
24
-
25
-
26
-
27
-
28
-
29
-
30
-
31
-
32
-
33
-
34
-
35
-
36
-
37
-
38
-
39
-
40
-
41
-
42
-
43
-
44
-
45
-
46
-
47
-
48
-
49
-
50
-
51
-
52
-
53
-
54
-
55
-
56
-
57
-
58
-
59
-
60
-
61
-
62
-
63
-
64
-
65
-
66
-
67
-
68
-
69
-
70
-
71
-
72
-
73
-
74
-
75
-
76
-
77
-
78
-
79
-
80
-
81
-
82
-
83
-
84
-
85
-
86
-
87
-
88
-
89
-
90
-
91
-
92
-
93
-
94
-
95
-
96
 |
 |
