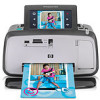
HP Photosmart A640 User Guide - Page 69
The printer does not appear in Printers and Faxes (Windows only) - instructions manual
 |
View all HP Photosmart A640 manuals
Add to My Manuals
Save this manual to your list of manuals |
Page 69 highlights
Troubleshooting The printer does not appear in Printers and Faxes (Windows only) Try the following solutions to resolve the issue. If the first solution does not solve the problem, continue trying the remaining solutions until the issue is resolved. • Solution 1: Retry the installation • Solution 2: Disable Software Install Mode Solution 1: Retry the installation Solution: Make sure the software is installed by verifying that there is HP Photosmart A640 series folder in the HP folder of the Windows Start menu. If the folder does not appear in the Start menu, retry the installation. Cause: The installation did not finish properly for an unknown reason. If this did not solve the issue, try the next solution. Solution 2: Disable Software Install Mode Solution: Disable Software Install Mode and check Printers and Faxes again. To disable Software Install Mode 1. Touch the Setup icon to display the Setup menu. For more information, see Setup Menu. 2. Touch Preferences. 3. Touch Software Install Mode. 4. Make sure Off is checked. 5. Turn the printer off, wait 10 seconds, and then turn the printer back on. 6. Check to see if the printer appears in Printers and Faxes. Cause: The installation may not have fully completed. The installation did not start automatically Try the following solutions to resolve the issue. If the first solution does not solve the problem, continue trying the remaining solutions until the issue is resolved. • Solution 1: Start the installation manually • Solution 2: Make sure Software Install Mode is enabled • Solution 3: Turn the printer off and then back on • Solution 4: Make a drive letter available Solution 1: Start the installation manually Solution: Start the installation manually. Follow the instructions on the printer screen. Cause: Autorun is disabled. If this did not solve the issue, try the next solution. Software installation issues 67
-
 1
1 -
2
-
3
-
4
-
5
-
6
-
7
-
8
-
9
-
10
-
11
-
12
-
13
-
14
-
15
-
16
-
17
-
18
-
19
-
20
-
21
-
22
-
23
-
24
-
25
-
26
-
27
-
28
-
29
-
30
-
31
-
32
-
33
-
34
-
35
-
36
-
37
-
38
-
39
-
40
-
41
-
42
-
43
-
44
-
45
-
46
-
47
-
48
-
49
-
50
-
51
-
52
-
53
-
54
-
55
-
56
-
57
-
58
-
59
-
60
-
61
-
62
-
63
-
 64
64 -
 65
65 -
 66
66 -
 67
67 -
 68
68 -
 69
69 -
 70
70 -
 71
71 -
 72
72 -
 73
73 -
 74
74 -
75
-
76
-
77
-
78
-
79
-
80
-
81
-
82
-
83
-
84
-
85
-
86
-
87
-
88
-
89
-
90
-
91
-
92
-
93
-
94
-
95
-
96
 |
 |
