HP Rp5700 HP rp5700 Business System Service Reference Guide, 1st Edition - Page 12
Downloading Microsoft Windows Updates, Transferring Files and Settings, Creating a Disc Recovery Set - update windows 7
 |
UPC - 884420470731
View all HP Rp5700 manuals
Add to My Manuals
Save this manual to your list of manuals |
Page 12 highlights
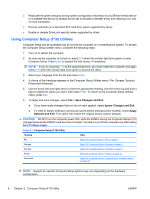
Downloading Microsoft Windows Updates 1. To set up your Internet connection, click Start > Internet Explorerand follow the instructions on the screen. 2. Once an Internet connection has been established, click the Start button. 3. Select the All Programs menu. 4. Click on the Windows Update link. In Microsoft Windows XP, you will be directed to the Microsoft Windows Update Web site. If you see one or more pop-up windows that ask you to install a program from http://www.microsoft.com, click Yes to install the program. Follow the instructions on the Microsoft Web site to scan for updates and install critical updates and service packs. In Microsoft Windows Vista, the Windows Update screen appears. Click view available updates and make sure all critical updates are selected. Click the Install button and follow the instructions on the screen. It is recommended that you install all of the critical updates and service packs. 5. After the updates have been installed, Windows will prompt you to reboot the machine. Be sure to save any files or documents that you may have open before rebooting. Then select Yes to reboot the machine. Transferring Files and Settings Use the Microsoft Windows XP Files and Settings Transfer Wizard to move files and settings from an old computer to a new one. Click Start > All Programs > Accessories > System Tools > Files and Settings Transfer Wizard. Follow the wizard to transfer the files and settings to the new computer. Creating a Disc Recovery Set CAUTION: HP no longer ships the Restore Plus! CD with PCs. Instead, HP Backup and Recovery Manager is pre-loaded on each system. HP recommends the creation of a recovery CD as soon as the computer has been set up. Creating the Restore Plus! CD set is important in the event that you ever need to restore the system hard drive to its factory installed state. HP Backup and Recovery Manager can create the Restore Plus CD set, This set includes the Restore Plus CD, the Operating System CD, and any Supplemental Software CDs. CAUTION: The Restore Plus CD set will not include any system settings or user data created after the initial system setup. To create the Restore Plus CD set: 1. Click Start > HP Backup and Recovery > HP Backup and Recovery Manager to open the Backup and Recovery Wizard, then click Next. 2. Select Create factory software recovery CDs or DVDs to recover the system. 3. Follow the instructions in the wizard. The HP Backup and Recovery Manager can be used to back up data and system files to the hard drive, to network drives, or to removable media, such as CDs, DVDs, or flash media. If data or system files 2 Chapter 1 Install the Operating System ENWW
-
 1
1 -
2
-
3
-
4
-
5
-
6
-
 7
7 -
 8
8 -
 9
9 -
 10
10 -
 11
11 -
 12
12 -
 13
13 -
 14
14 -
 15
15 -
 16
16 -
 17
17 -
18
-
19
-
20
-
21
-
22
-
23
-
24
-
25
-
26
-
27
-
28
-
29
-
30
-
31
-
32
-
33
-
34
-
35
-
36
-
37
-
38
-
39
-
40
-
41
-
42
-
43
-
44
-
45
-
46
-
47
-
48
-
49
-
50
-
51
-
52
-
53
-
54
-
55
-
56
-
57
-
58
-
59
-
60
-
61
-
62
-
63
-
64
-
65
-
66
-
67
-
68
-
69
-
70
-
71
-
72
-
73
-
74
-
75
-
76
-
77
-
78
-
79
-
80
-
81
-
82
-
83
-
84
-
85
-
86
-
87
-
88
-
89
-
90
-
91
-
92
-
93
-
94
-
95
-
96
-
97
-
98
-
99
-
100
-
101
-
102
-
103
-
104
-
105
-
106
-
107
-
108
-
109
-
110
-
111
-
112
-
113
-
114
-
115
-
116
-
117
-
118
-
119
-
120
-
121
-
122
-
123
-
124
-
125
-
126
-
127
-
128
-
129
-
130
-
131
-
132
-
133
-
134
-
135
-
136
-
137
-
138
-
139
-
140
-
141
-
142
-
143
-
144
-
145
-
146
-
147
-
148
-
149
-
150
-
151
-
152
-
153
-
154
-
155
-
156
-
157
-
158
-
159
-
160
-
161
-
162
-
163
-
164
-
165
-
166
-
167
-
168
-
169
-
170
-
171
-
172
-
173
-
174
-
175
-
176
-
177
-
178
-
179
-
180
-
181
-
182
-
183
-
184
-
185
-
186
-
187
-
188
-
189
-
190
-
191
-
192
-
193
-
194
-
195
-
196
 |
 |