HP Scanjet 7450c HP Scanjet 7400C Series Scanner Mac - (English) User Manual - Page 107
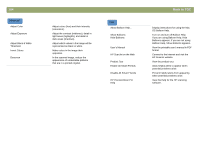
Context-sensitive cursors, Selection area cursor, Ready cursor, Typing cursor, Pixel value cursor
 |
View all HP Scanjet 7450c manuals
Add to My Manuals
Save this manual to your list of manuals |
Page 107 highlights
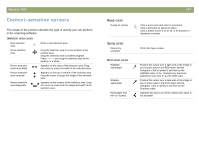
Back to TOC Context-sensitive cursors The shape of the pointer indicates the type of activity you can perform in the scanning software. Selection area cursor New selection area Draw a new selection area. Move selection area Drag the selection area to a new location in the preview area. Drag the selection area to another program. Press OPTION and drag the selection area to the desktop or a folder. Resize selection area horizontally Appears on the sides of the selection area. Drag the cursor to resize the width of the selection area. Resize selection area vertically Appears on the top or bottom of the selection area. Drag the cursor to resize the height of the selection area. Resize selection area diagonally Appears on the corners of the selection area. Drag the cursor to resize both the height and width of the selection area. Ready cursor Ready for activity Typing cursor Data entry accepted Pixel value cursor Highlight eyedropper Shadow eyedropper Eyedropper and the "no" symbol 107 Click a menu item and select a command. Click a list button to select an option. Click a button to turn it on or off, or to increase or decrease a number. Click, then type a value. Position this cursor over a light area in the image to see its pixel value in the RGB meter and the histogram. Click on pixels to set them as the Highlight value. In the Transparency Exposure Adjustment tool, click to set the RGB value. Position this cursor over a dark area of the image to see its pixel value in the RGB meter and the histogram. Click on pixels to set them as the Shadows value. Indicates this area is an area in which pixel value is not available.
-
 1
1 -
2
-
3
-
4
-
5
-
6
-
7
-
8
-
9
-
10
-
11
-
12
-
13
-
14
-
15
-
16
-
17
-
18
-
19
-
20
-
21
-
22
-
23
-
24
-
25
-
26
-
27
-
28
-
29
-
30
-
31
-
32
-
33
-
34
-
35
-
36
-
37
-
38
-
39
-
40
-
41
-
42
-
43
-
44
-
45
-
46
-
47
-
48
-
49
-
50
-
51
-
52
-
53
-
54
-
55
-
56
-
57
-
58
-
59
-
60
-
61
-
62
-
63
-
64
-
65
-
66
-
67
-
68
-
69
-
70
-
71
-
72
-
73
-
74
-
75
-
76
-
77
-
78
-
79
-
80
-
81
-
82
-
83
-
84
-
85
-
86
-
87
-
88
-
89
-
90
-
91
-
92
-
93
-
94
-
95
-
96
-
97
-
98
-
99
-
100
-
101
-
 102
102 -
 103
103 -
 104
104 -
 105
105 -
 106
106 -
 107
107 -
 108
108 -
 109
109 -
 110
110 -
 111
111 -
 112
112 -
113
-
114
-
115
-
116
-
117
-
118
-
119
-
120
-
121
-
122
-
123
-
124
-
125
-
126
-
127
-
128
-
129
-
130
-
131
-
132
 |
 |