HP Scanjet 7450c HP Scanjet 7400C Series Scanner Mac - (English) User Manual - Page 51
Returning the image to a program that supports TWAIN or the HP ScanJet Plug-in
 |
View all HP Scanjet 7450c manuals
Add to My Manuals
Save this manual to your list of manuals |
Page 51 highlights
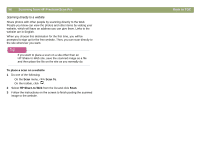
Back to TOC To create editable text 1 Choose Scan To from the Scan menu. 2 Choose Text File from the Destination pull-down menu, and then click Scan. 3 Select a text or text-and-image file format in the Format pull-down menu, and then click Save. See "List of file types" on page 52. 4 If the program you select accepts multipage files, you might be asked if you have more pages to scan to this file. Do one of the following: q If this is a one-page item, click Done. q If there are more pages of this item, load the next page in the scanner and click Scan on the computer. Repeat until all pages are scanned. Then, click Done. The OCR program opens and creates editable text from the scanned image. Note: You can also save a scanned image and import the image into your OCR software. See "To save a scan for future processing in OCR software" on page 52. Scanning from HP PrecisionScan Pro 51 Returning the image to a program that supports TWAIN or the HP ScanJet Plug-in If you started the scan from a program that supports TWAIN or the HP ScanJet Plug-in, you can perform a final scan and return the image to that program using this procedure. For more information about scanning using TWAIN or the HP ScanJet Plug-in, see "Scanning from other programs" on page 64. To return the image to a program Do one of the following: q On the Scan menu, click Return Image To. q On the toolbar, click .
-
 1
1 -
2
-
3
-
4
-
5
-
6
-
7
-
8
-
9
-
10
-
11
-
12
-
13
-
14
-
15
-
16
-
17
-
18
-
19
-
20
-
21
-
22
-
23
-
24
-
25
-
26
-
27
-
28
-
29
-
30
-
31
-
32
-
33
-
34
-
35
-
36
-
37
-
38
-
39
-
40
-
41
-
42
-
43
-
44
-
45
-
 46
46 -
 47
47 -
 48
48 -
 49
49 -
 50
50 -
 51
51 -
 52
52 -
 53
53 -
 54
54 -
 55
55 -
 56
56 -
57
-
58
-
59
-
60
-
61
-
62
-
63
-
64
-
65
-
66
-
67
-
68
-
69
-
70
-
71
-
72
-
73
-
74
-
75
-
76
-
77
-
78
-
79
-
80
-
81
-
82
-
83
-
84
-
85
-
86
-
87
-
88
-
89
-
90
-
91
-
92
-
93
-
94
-
95
-
96
-
97
-
98
-
99
-
100
-
101
-
102
-
103
-
104
-
105
-
106
-
107
-
108
-
109
-
110
-
111
-
112
-
113
-
114
-
115
-
116
-
117
-
118
-
119
-
120
-
121
-
122
-
123
-
124
-
125
-
126
-
127
-
128
-
129
-
130
-
131
-
132
 |
 |