HP Scanjet 7450c HP Scanjet 7400C Series Scanner Mac - (English) User Manual - Page 40
Changing midtones, Midtone, Advanced, Adjust Exposure
 |
View all HP Scanjet 7450c manuals
Add to My Manuals
Save this manual to your list of manuals |
Page 40 highlights
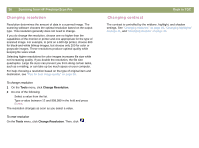
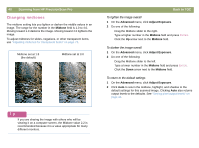
40 Scanning from HP PrecisionScan Pro Changing midtones The midtone setting lets you lighten or darken the middle values in an image. The range for the number in the Midtone field is 1.0 to 4.0. Moving toward 1.0 darkens the image. Moving toward 4.0 lightens the image. To adjust midtones for slides, negatives, or other transparent items, use "Adjusting midtones for transparent items" on page 73. Midtone set at 1.8 (the default) Midtone set at 3.0 Back to TOC To lighten the image overall 1 On the Advanced menu, click Adjust Exposure. 2 Do one of the following: q Drag the Midtone slider to the right. q Type a higher number in the Midtone field and press ENTER. q Click the Up arrow next to the Midtone field. To darken the image overall 1 On the Advanced menu, click Adjust Exposure. 2 Do one of the following: q Drag the Midtone slider to the left. q Type a lower number in the Midtone field and press ENTER. q Click the Down arrow next to the Midtone field. To return to the default settings 1 On the Advanced menu, click Adjust Exposure. 2 Click Auto to return the midtone, highlight, and shadow to the default settings for this scanned image. Clicking Auto also returns output levels to the defaults. See "Setting pixel output levels" on page 44. Tip If you are sharing the image with others who will be viewing it on a computer screen, the Midtone value 2.2 is recommended because it is a value appropriate for many different monitors.
-
 1
1 -
2
-
3
-
4
-
5
-
6
-
7
-
8
-
9
-
10
-
11
-
12
-
13
-
14
-
15
-
16
-
17
-
18
-
19
-
20
-
21
-
22
-
23
-
24
-
25
-
26
-
27
-
28
-
29
-
30
-
31
-
32
-
33
-
34
-
 35
35 -
 36
36 -
 37
37 -
 38
38 -
 39
39 -
 40
40 -
 41
41 -
 42
42 -
 43
43 -
 44
44 -
 45
45 -
46
-
47
-
48
-
49
-
50
-
51
-
52
-
53
-
54
-
55
-
56
-
57
-
58
-
59
-
60
-
61
-
62
-
63
-
64
-
65
-
66
-
67
-
68
-
69
-
70
-
71
-
72
-
73
-
74
-
75
-
76
-
77
-
78
-
79
-
80
-
81
-
82
-
83
-
84
-
85
-
86
-
87
-
88
-
89
-
90
-
91
-
92
-
93
-
94
-
95
-
96
-
97
-
98
-
99
-
100
-
101
-
102
-
103
-
104
-
105
-
106
-
107
-
108
-
109
-
110
-
111
-
112
-
113
-
114
-
115
-
116
-
117
-
118
-
119
-
120
-
121
-
122
-
123
-
124
-
125
-
126
-
127
-
128
-
129
-
130
-
131
-
132
 |
 |
