HP Visualize b180L hp Visualize workstation b132L, b132L plus, b160L, b180L se - Page 124
FRU Removal and Replacement
 |
View all HP Visualize b180L manuals
Add to My Manuals
Save this manual to your list of manuals |
Page 124 highlights
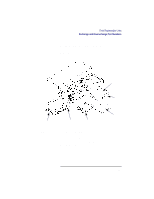
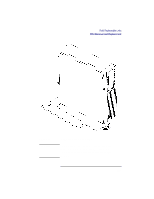
Field Replaceable Units FRU Removal and Replacement NOTICE: CAUTION: FRU Removal and Replacement The procedures in this section describe how to remove system unit FRUs. Observe any notices and prerequisites for removing a FRU. Replacement is the reverse of removal, unless noted. 1 Power off the system, the monitor, and any peripheral devices. There is no need to manually shut down the HPUX operating system on the workstation before powering it off with the power switch. When the power switch is turned off, the workstation automatically shuts down the operating system before terminating the power. Unplugging the power cord while HP-UX is running can damage the system files. 2 When the system has completely shut down and powered off, unplug the system unit power cord and the power cords of any peripheral devices from ac wall outlets. 3 Unplug the system unit power cord from the ac input connector. 4 Disconnect any external cables from the connectors on the front and rear of the system unit. 5 Attach a static-grounding wrist strap to your wrist and a location on the system chassis that is bare metal. If you are using a disposable wrist strap, follow the instructions on the package. 6 If installed, remove the floor stand as shown in Figure 18. 102
-
 1
1 -
2
-
3
-
4
-
5
-
6
-
7
-
8
-
9
-
10
-
11
-
12
-
13
-
14
-
15
-
16
-
17
-
18
-
19
-
20
-
21
-
22
-
23
-
24
-
25
-
26
-
27
-
28
-
29
-
30
-
31
-
32
-
33
-
34
-
35
-
36
-
37
-
38
-
39
-
40
-
41
-
42
-
43
-
44
-
45
-
46
-
47
-
48
-
49
-
50
-
51
-
52
-
53
-
54
-
55
-
56
-
57
-
58
-
59
-
60
-
61
-
62
-
63
-
64
-
65
-
66
-
67
-
68
-
69
-
70
-
71
-
72
-
73
-
74
-
75
-
76
-
77
-
78
-
79
-
80
-
81
-
82
-
83
-
84
-
85
-
86
-
87
-
88
-
89
-
90
-
91
-
92
-
93
-
94
-
95
-
96
-
97
-
98
-
99
-
100
-
101
-
102
-
103
-
104
-
105
-
106
-
107
-
108
-
109
-
110
-
111
-
112
-
113
-
114
-
115
-
116
-
117
-
118
-
 119
119 -
 120
120 -
 121
121 -
 122
122 -
 123
123 -
 124
124 -
 125
125 -
 126
126 -
 127
127 -
 128
128 -
 129
129 -
130
-
131
-
132
-
133
-
134
-
135
-
136
-
137
-
138
-
139
-
140
-
141
-
142
-
143
-
144
-
145
-
146
-
147
-
148
-
149
-
150
-
151
-
152
-
153
-
154
-
155
-
156
-
157
-
158
-
159
-
160
-
161
-
162
-
163
-
164
-
165
-
166
-
167
-
168
-
169
-
170
-
171
-
172
-
173
-
174
-
175
-
176
-
177
-
178
-
179
-
180
-
181
-
182
-
183
-
184
-
185
-
186
-
187
-
188
-
189
-
190
-
191
-
192
-
193
-
194
-
195
-
196
-
197
-
198
-
199
-
200
-
201
-
202
-
203
-
204
-
205
-
206
-
207
-
208
-
209
-
210
-
211
-
212
-
213
-
214
-
215
-
216
-
217
-
218
-
219
-
220
-
221
-
222
-
223
-
224
-
225
-
226
-
227
-
228
-
229
-
230
-
231
-
232
-
233
-
234
-
235
-
236
-
237
-
238
-
239
-
240
-
241
-
242
 |
 |