HP Visualize b180L hp Visualize workstation b132L, b132L plus, b160L, b180L se - Page 136
Storage Tray Assembly, Removing the Memory Retainer
 |
View all HP Visualize b180L manuals
Add to My Manuals
Save this manual to your list of manuals |
Page 136 highlights
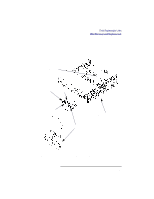
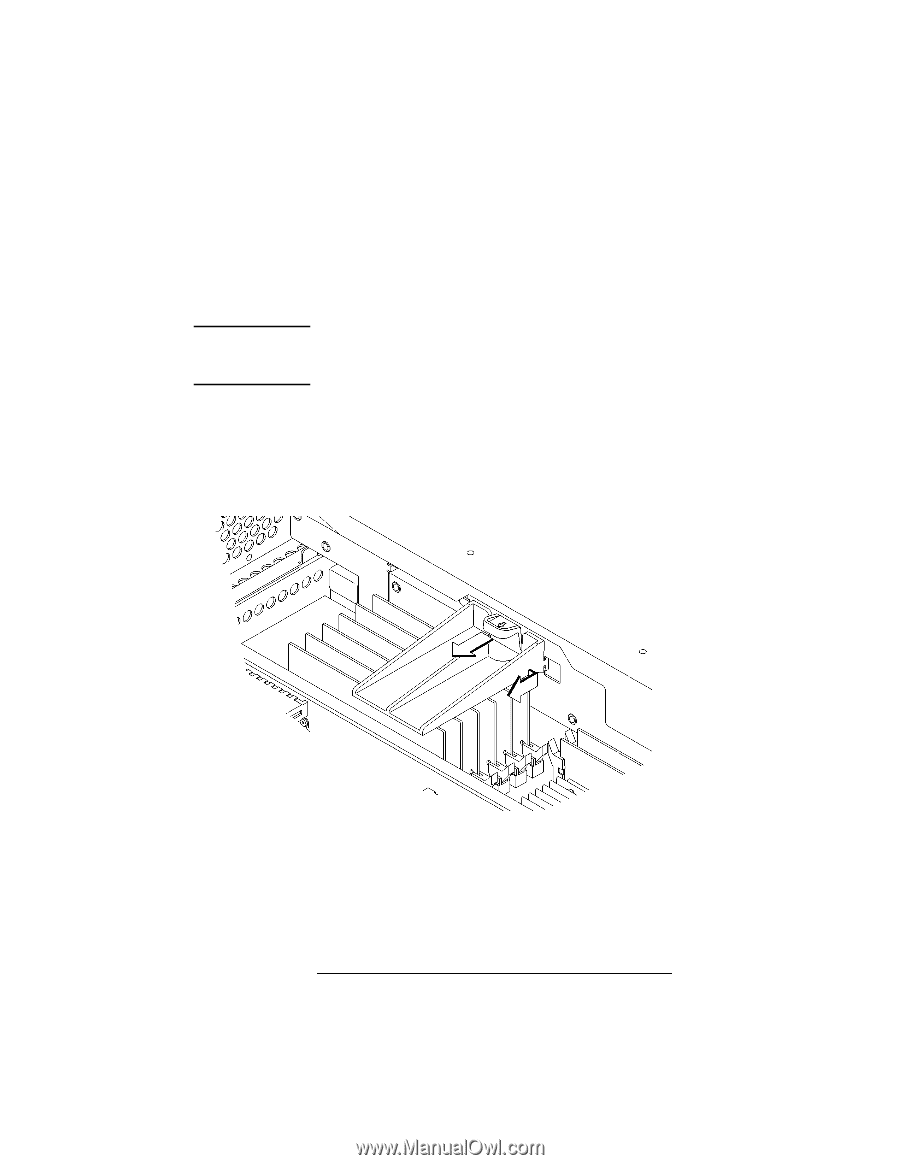
NOTICE: Field Replaceable Units FRU Removal and Replacement Storage Tray Assembly Before removing the Storage Tray Assembly, remove the Main Tray Assembly from the system unit. The Storage Tray Assembly does not have to be removed from the system unit to access a hard disk drive or the 3.5-inch floppy drive. Perform the following steps to remove the storage tray assembly from the Main Tray: 1 Pull the tab on the memory retainer and slide it toward the front of the main tray to remove it, as shown in Figure 28 Figure 28 Removing the Memory Retainer 114
-
 1
1 -
2
-
3
-
4
-
5
-
6
-
7
-
8
-
9
-
10
-
11
-
12
-
13
-
14
-
15
-
16
-
17
-
18
-
19
-
20
-
21
-
22
-
23
-
24
-
25
-
26
-
27
-
28
-
29
-
30
-
31
-
32
-
33
-
34
-
35
-
36
-
37
-
38
-
39
-
40
-
41
-
42
-
43
-
44
-
45
-
46
-
47
-
48
-
49
-
50
-
51
-
52
-
53
-
54
-
55
-
56
-
57
-
58
-
59
-
60
-
61
-
62
-
63
-
64
-
65
-
66
-
67
-
68
-
69
-
70
-
71
-
72
-
73
-
74
-
75
-
76
-
77
-
78
-
79
-
80
-
81
-
82
-
83
-
84
-
85
-
86
-
87
-
88
-
89
-
90
-
91
-
92
-
93
-
94
-
95
-
96
-
97
-
98
-
99
-
100
-
101
-
102
-
103
-
104
-
105
-
106
-
107
-
108
-
109
-
110
-
111
-
112
-
113
-
114
-
115
-
116
-
117
-
118
-
119
-
120
-
121
-
122
-
123
-
124
-
125
-
126
-
127
-
128
-
129
-
130
-
 131
131 -
 132
132 -
 133
133 -
 134
134 -
 135
135 -
 136
136 -
 137
137 -
 138
138 -
 139
139 -
 140
140 -
 141
141 -
142
-
143
-
144
-
145
-
146
-
147
-
148
-
149
-
150
-
151
-
152
-
153
-
154
-
155
-
156
-
157
-
158
-
159
-
160
-
161
-
162
-
163
-
164
-
165
-
166
-
167
-
168
-
169
-
170
-
171
-
172
-
173
-
174
-
175
-
176
-
177
-
178
-
179
-
180
-
181
-
182
-
183
-
184
-
185
-
186
-
187
-
188
-
189
-
190
-
191
-
192
-
193
-
194
-
195
-
196
-
197
-
198
-
199
-
200
-
201
-
202
-
203
-
204
-
205
-
206
-
207
-
208
-
209
-
210
-
211
-
212
-
213
-
214
-
215
-
216
-
217
-
218
-
219
-
220
-
221
-
222
-
223
-
224
-
225
-
226
-
227
-
228
-
229
-
230
-
231
-
232
-
233
-
234
-
235
-
236
-
237
-
238
-
239
-
240
-
241
-
242
 |
 |
Field Replaceable Units
FRU Removal and Replacement
114
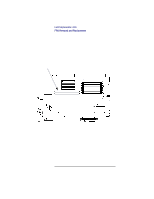
Storage Tray Assembly
Before removing the Storage Tray Assembly, remove
the Main Tray Assembly from the system unit.
NOTICE:
The Storage Tray Assembly does not have to
be removed from the system unit to access a
hard disk drive or the 3.5-inch floppy drive.
Perform the following steps to remove the storage tray
assembly from the Main Tray:
1
Pull the tab on the memory retainer and slide it toward
the front of the main tray to remove it, as shown in
Figure 28
Figure 28
Removing the Memory Retainer