HP XP20000/XP24000 HP StorageWorks XP24000/XP20000 Remote Web Console User Gui - Page 107
Restoring Backups of the Configuration Files, Download, Submit, Close
 |
View all HP XP20000/XP24000 manuals
Add to My Manuals
Save this manual to your list of manuals |
Page 107 highlights
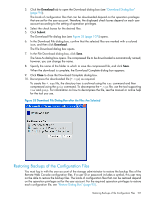
3. Click the Download tab to open the Download dialog box (see "Download Dialog Box" (page 94)). The kinds of configuration files that can be downloaded depend on the operation privileges that are set for the user account. Therefore, the displayed check boxes depend on each user account according to the setting of operation privileges. 4. Select the check boxes for the desired files. 5. Click Submit. The Download File dialog box (see Figure 53 (page 107)) opens. 6. In the Download File dialog box, confirm that the selected files are marked with a colored icon, and then click Download. The File Download dialog box opens. 7. In the File Download dialog box, click Save. The Save As dialog box opens. The compressed file to be downloaded is automatically named; however, you can change the name. 8. Specify the name of the folder in which to save the compressed file, and click Save. When the download is complete, the Download Complete dialog box appears. 9. Click Close to close the Download Complete dialog box. 10. Decompress the downloaded file (*.tgz) as required. To create the *.tgz file, the directory tree is archived using the tar command and then compressed using the gzip command. To decompress the *.tgz file, use the tool supporting tar and gzip. For information on how to decompress the file, see the manual or online help for the tool you use. Figure 53 Download File Dialog Box after the Files Are Selected Restoring Backups of the Configuration Files You must log in with the user account of the storage administrator to restore the backup files of the Remote Web Console configuration files. If a user ID or password includes a symbol, this user may not be able to restore the backup files. The kinds of configuration files that can be restored depend on the operation privileges set for the user account. For the required operation privileges to restore each configuration file, see "Restore Dialog Box" (page 95). Restoring Backups of the Configuration Files 107
-
 1
1 -
2
-
3
-
4
-
5
-
6
-
7
-
8
-
9
-
10
-
11
-
12
-
13
-
14
-
15
-
16
-
17
-
18
-
19
-
20
-
21
-
22
-
23
-
24
-
25
-
26
-
27
-
28
-
29
-
30
-
31
-
32
-
33
-
34
-
35
-
36
-
37
-
38
-
39
-
40
-
41
-
42
-
43
-
44
-
45
-
46
-
47
-
48
-
49
-
50
-
51
-
52
-
53
-
54
-
55
-
56
-
57
-
58
-
59
-
60
-
61
-
62
-
63
-
64
-
65
-
66
-
67
-
68
-
69
-
70
-
71
-
72
-
73
-
74
-
75
-
76
-
77
-
78
-
79
-
80
-
81
-
82
-
83
-
84
-
85
-
86
-
87
-
88
-
89
-
90
-
91
-
92
-
93
-
94
-
95
-
96
-
97
-
98
-
99
-
100
-
101
-
 102
102 -
 103
103 -
 104
104 -
 105
105 -
 106
106 -
 107
107 -
 108
108 -
 109
109 -
 110
110 -
 111
111 -
 112
112 -
113
-
114
-
115
-
116
-
117
-
118
-
119
-
120
-
121
-
122
-
123
-
124
-
125
-
126
-
127
-
128
-
129
-
130
-
131
-
132
-
133
-
134
-
135
-
136
-
137
-
138
-
139
-
140
-
141
-
142
-
143
-
144
-
145
-
146
-
147
-
148
-
149
-
150
-
151
 |
 |
