HP XP20000/XP24000 HP StorageWorks XP24000/XP20000 Remote Web Console User Gui - Page 99
Enabling Options Automatically, Enabling or Disabling a License
 |
View all HP XP20000/XP24000 manuals
Add to My Manuals
Save this manual to your list of manuals |
Page 99 highlights
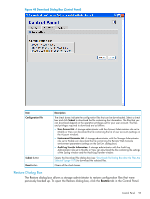
Figure 50 Install/Uninstall Error Dialog Box Enabling Options Automatically When the licensed capacity exceeds the mounted capacity after you reduce the number of disk drives, or when the licensed capacity exceeds the used capacity after you delete pairs or pools, you can automatically enable the available Remote Web Console options using the Available button. Whether the options can be enabled using the Available button depends on the relationship between the licensed capacity and the mounted capacity of the disk drives (or the used capacity of the pairs or pools). Table 29 (page 99) shows the condition to enable the Available button. Table 29 Condition to Enable Available Button Relationship between Licensed Capacity and Mounted Capacity (or Used Capacity) Mounted capacity or used capacity Licensed capacity Mounted capacity or used capacity > Licensed capacity Available Button Available Not available To install Remote Web Console options automatically on Remote Web Console using the Available button: 1. Log in to Remote Web Console and open the License Key window (see "License Key Window" (page 56)). 2. Change to Modify mode. 3. From Mode, click Available. 4. Click Install. In the License Key list, the row of the options that can be enabled changes to blue bold italics, and the Status column changes to Install. 5. Click Apply (or Cancel). The status of the enabled options changes to Installed. Enabling or Disabling a License When you want to enable or disable the term key, you select Enable or Disable for the License Status. You can also enable licenses when you install more than one program product option at once; however, some program product options are not available because their requirements are not satisfied. In this case, you need to satisfy the requirements first, and then enable the license. To enable or disable a license: 1. Log in to Remote Web Console and open the License Key window (see "License Key Window" (page 56)). Enabling and Disabling Remote Web Console Options 99
-
 1
1 -
2
-
3
-
4
-
5
-
6
-
7
-
8
-
9
-
10
-
11
-
12
-
13
-
14
-
15
-
16
-
17
-
18
-
19
-
20
-
21
-
22
-
23
-
24
-
25
-
26
-
27
-
28
-
29
-
30
-
31
-
32
-
33
-
34
-
35
-
36
-
37
-
38
-
39
-
40
-
41
-
42
-
43
-
44
-
45
-
46
-
47
-
48
-
49
-
50
-
51
-
52
-
53
-
54
-
55
-
56
-
57
-
58
-
59
-
60
-
61
-
62
-
63
-
64
-
65
-
66
-
67
-
68
-
69
-
70
-
71
-
72
-
73
-
74
-
75
-
76
-
77
-
78
-
79
-
80
-
81
-
82
-
83
-
84
-
85
-
86
-
87
-
88
-
89
-
90
-
91
-
92
-
93
-
 94
94 -
 95
95 -
 96
96 -
 97
97 -
 98
98 -
 99
99 -
 100
100 -
 101
101 -
 102
102 -
 103
103 -
 104
104 -
105
-
106
-
107
-
108
-
109
-
110
-
111
-
112
-
113
-
114
-
115
-
116
-
117
-
118
-
119
-
120
-
121
-
122
-
123
-
124
-
125
-
126
-
127
-
128
-
129
-
130
-
131
-
132
-
133
-
134
-
135
-
136
-
137
-
138
-
139
-
140
-
141
-
142
-
143
-
144
-
145
-
146
-
147
-
148
-
149
-
150
-
151
 |
 |
