HP XP20000/XP24000 HP StorageWorks XP24000/XP20000 Remote Web Console User Gui - Page 98
Enabling Options Using a License Key File, Apply, Cancel, Installed, Browse, File Name, Detail
 |
View all HP XP20000/XP24000 manuals
Add to My Manuals
Save this manual to your list of manuals |
Page 98 highlights
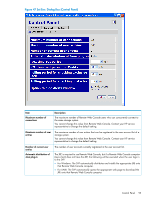
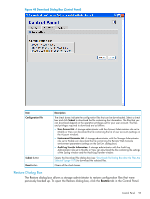
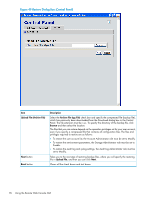
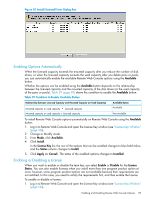
6. Click Apply (or Cancel). The status of the enabled options changes to Installed. The warning messages are displayed in the following cases: • The error code # 405 5503 is displayed if you install an emergency key for an option that has already been installed with a permanent key. If you install the emergency key, it expires in 30 days. • The error code #405 5501 is displayed if you install an emergency key when the option has already been installed with a temporary key, and the remaining lifetime of the option is more than 30 days. You cannot install an emergency key under these circumstances. For details on these error codes, see the HP StorageWorks XP24000/XP20000 Remote Web Console Error Codes. Enabling Options Using a License Key File You can enable multiple options in a single procedure using a license key file. The license key files are provided by HP. To install Remote Web Console options on Remote Web Console using the license key file: 1. Log in to Remote Web Console and open the License Key window (see "License Key Window" (page 56)). 2. Change to Modify mode. 3. From Mode, click File. The Browse button becomes available. 4. Click Browse to display the dialog box, and select the license key file (the file extension is plk) to be used for installing options on the displayed window. The selected file name is displayed in the File Name text box. The file name must be up to 200 alphanumeric characters (ASCII codes), except for some symbols, such as You need to be careful with the license key file name. 5. Click Install. The time taken for installing depends on the number of license key codes that you install. For example, if you install 30 key codes, it takes about three minutes. If you install 1,000 key codes, it may take more than 60 minutes. 6. Click Apply (or Cancel). The status of the enabled options changes to Installed. If the installation fails or an error occurs during the installation, a message appears listing the failed options (see Figure 50 (page 99)). To display the error detail in the dialog box, select the failed option and then click Detail. 98 Performing Remote Web Console Operations
-
 1
1 -
2
-
3
-
4
-
5
-
6
-
7
-
8
-
9
-
10
-
11
-
12
-
13
-
14
-
15
-
16
-
17
-
18
-
19
-
20
-
21
-
22
-
23
-
24
-
25
-
26
-
27
-
28
-
29
-
30
-
31
-
32
-
33
-
34
-
35
-
36
-
37
-
38
-
39
-
40
-
41
-
42
-
43
-
44
-
45
-
46
-
47
-
48
-
49
-
50
-
51
-
52
-
53
-
54
-
55
-
56
-
57
-
58
-
59
-
60
-
61
-
62
-
63
-
64
-
65
-
66
-
67
-
68
-
69
-
70
-
71
-
72
-
73
-
74
-
75
-
76
-
77
-
78
-
79
-
80
-
81
-
82
-
83
-
84
-
85
-
86
-
87
-
88
-
89
-
90
-
91
-
92
-
 93
93 -
 94
94 -
 95
95 -
 96
96 -
 97
97 -
 98
98 -
 99
99 -
 100
100 -
 101
101 -
 102
102 -
 103
103 -
104
-
105
-
106
-
107
-
108
-
109
-
110
-
111
-
112
-
113
-
114
-
115
-
116
-
117
-
118
-
119
-
120
-
121
-
122
-
123
-
124
-
125
-
126
-
127
-
128
-
129
-
130
-
131
-
132
-
133
-
134
-
135
-
136
-
137
-
138
-
139
-
140
-
141
-
142
-
143
-
144
-
145
-
146
-
147
-
148
-
149
-
150
-
151
 |
 |
