Konica Minolta bizhub PRESS C7000/C7000P IC-307 User Guide - Page 103
Generating a corner mark and barcode, place the corner mark and barcode.
 |
View all Konica Minolta bizhub PRESS C7000/C7000P manuals
Add to My Manuals
Save this manual to your list of manuals |
Page 103 highlights
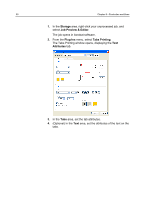
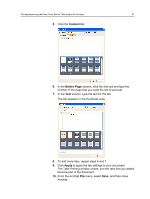
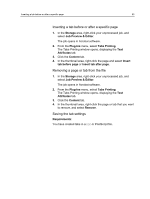
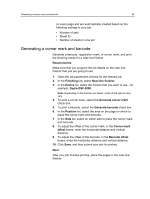
Generating a corner mark and barcode 95 on every page and are automatically created based on the following settings in your job: ● Number of sets ● Sheet ID ● Number of sheets in one set Generating a corner mark and barcode Generate a barcode, registration mark, or corner mark, and print the finishing marks for a near-line finisher Requirements: Make sure that you program the job details on the near-line finisher that you are going to use. 1. Open the job parameters window for the desired job. 2. In the Finishing tab, select Near-line finisher. 3. In the Device list, select the finisher that you want to use-for example, Duplo DSF-2000. Note: Depending on the finisher you select, some of the options may vary. 4. To print a corner mark, select the Generate corner mark check box. 5. To print a barcode, select the Generate barcode check box. 6. In the Position list, select the area on the page on which to place the corner mark and barcode. 7. In the Side list, select on which side to place the corner mark and barcode. 8. To adjust the offset of the corner mark, in the Corner mark offset boxes, enter the horizontal distance and vertical distance. 9. To adjust the offset of the barcode, in the Barcode offset boxes, enter the horizontal distance and vertical distance. 10. Click Save, and then submit your job for printing. Next: After your job finishes printing, place the pages in the near-line finisher.
-
 1
1 -
2
-
3
-
4
-
5
-
6
-
7
-
8
-
9
-
10
-
11
-
12
-
13
-
14
-
15
-
16
-
17
-
18
-
19
-
20
-
21
-
22
-
23
-
24
-
25
-
26
-
27
-
28
-
29
-
30
-
31
-
32
-
33
-
34
-
35
-
36
-
37
-
38
-
39
-
40
-
41
-
42
-
43
-
44
-
45
-
46
-
47
-
48
-
49
-
50
-
51
-
52
-
53
-
54
-
55
-
56
-
57
-
58
-
59
-
60
-
61
-
62
-
63
-
64
-
65
-
66
-
67
-
68
-
69
-
70
-
71
-
72
-
73
-
74
-
75
-
76
-
77
-
78
-
79
-
80
-
81
-
82
-
83
-
84
-
85
-
86
-
87
-
88
-
89
-
90
-
91
-
92
-
93
-
94
-
95
-
96
-
97
-
 98
98 -
 99
99 -
 100
100 -
 101
101 -
 102
102 -
 103
103 -
 104
104 -
 105
105 -
 106
106 -
 107
107 -
 108
108 -
109
-
110
-
111
-
112
-
113
-
114
-
115
-
116
-
117
-
118
-
119
-
120
-
121
-
122
-
123
-
124
-
125
-
126
-
127
-
128
-
129
-
130
-
131
-
132
-
133
-
134
-
135
-
136
-
137
-
138
-
139
-
140
-
141
-
142
-
143
-
144
-
145
-
146
-
147
-
148
-
149
-
150
-
151
-
152
-
153
-
154
-
155
-
156
-
157
-
158
-
159
-
160
-
161
-
162
-
163
-
164
-
165
-
166
-
167
-
168
-
169
-
170
-
171
-
172
-
173
-
174
-
175
-
176
-
177
-
178
-
179
-
180
-
181
-
182
-
183
-
184
-
185
-
186
-
187
-
188
-
189
-
190
-
191
-
192
-
193
-
194
-
195
-
196
 |
 |
