Konica Minolta bizhub PRESS C7000/C7000P IC-307 User Guide - Page 90
Same on Both Sides, Image Position
 |
View all Konica Minolta bizhub PRESS C7000/C7000P manuals
Add to My Manuals
Save this manual to your list of manuals |
Page 90 highlights
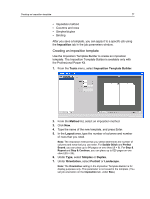
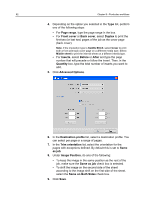
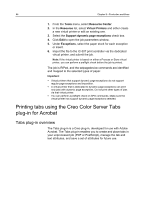
82 Chapter 8-Production workflows 4. Depending on the option you selected in the Type list, perform one of the following steps: ● For Page range, type the page range in the box. ● For Front cover or Back cover, select Duplex to print the first two (or last two) pages of the job as the cover page (back cover). Note: If the imposition type is Saddle Stitch, select Cover to print both a front and back cover page on a different media type. Select Middle sheet to print the internal sheet on a different media type. ● For Inserts, select Before or After and type the page number that will precede or follow the insert. Then, in the Quantity box, type the total number of inserts you want to add. 5. Click Advanced Options. 6. In the Destination profile list, select a destination profile. You can select per page or a range of pages. 7. In the Trim orientation list, select the orientation for the pages with exceptions defined. By default this is set to Same as job. 8. Under Image Position, do one of the following: ● To keep the image in the same position as the rest of the job, make sure the Same as job check box is selected. ● To shift the image on the second side of the sheet according to the image shift on the first side of the sheet, select the Same on Both Sides check box. 9. Click Save.
-
 1
1 -
2
-
3
-
4
-
5
-
6
-
7
-
8
-
9
-
10
-
11
-
12
-
13
-
14
-
15
-
16
-
17
-
18
-
19
-
20
-
21
-
22
-
23
-
24
-
25
-
26
-
27
-
28
-
29
-
30
-
31
-
32
-
33
-
34
-
35
-
36
-
37
-
38
-
39
-
40
-
41
-
42
-
43
-
44
-
45
-
46
-
47
-
48
-
49
-
50
-
51
-
52
-
53
-
54
-
55
-
56
-
57
-
58
-
59
-
60
-
61
-
62
-
63
-
64
-
65
-
66
-
67
-
68
-
69
-
70
-
71
-
72
-
73
-
74
-
75
-
76
-
77
-
78
-
79
-
80
-
81
-
82
-
83
-
84
-
 85
85 -
 86
86 -
 87
87 -
 88
88 -
 89
89 -
 90
90 -
 91
91 -
 92
92 -
 93
93 -
 94
94 -
 95
95 -
96
-
97
-
98
-
99
-
100
-
101
-
102
-
103
-
104
-
105
-
106
-
107
-
108
-
109
-
110
-
111
-
112
-
113
-
114
-
115
-
116
-
117
-
118
-
119
-
120
-
121
-
122
-
123
-
124
-
125
-
126
-
127
-
128
-
129
-
130
-
131
-
132
-
133
-
134
-
135
-
136
-
137
-
138
-
139
-
140
-
141
-
142
-
143
-
144
-
145
-
146
-
147
-
148
-
149
-
150
-
151
-
152
-
153
-
154
-
155
-
156
-
157
-
158
-
159
-
160
-
161
-
162
-
163
-
164
-
165
-
166
-
167
-
168
-
169
-
170
-
171
-
172
-
173
-
174
-
175
-
176
-
177
-
178
-
179
-
180
-
181
-
182
-
183
-
184
-
185
-
186
-
187
-
188
-
189
-
190
-
191
-
192
-
193
-
194
-
195
-
196
 |
 |