Konica Minolta bizhub PRESS C7000/C7000P IC-307 User Guide - Page 28
Creating a calibration table using the X-Rite i1 spectrophotometer, Requirements, Tools, Calibration
 |
View all Konica Minolta bizhub PRESS C7000/C7000P manuals
Add to My Manuals
Save this manual to your list of manuals |
Page 28 highlights
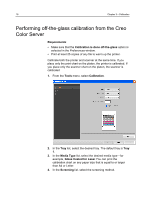
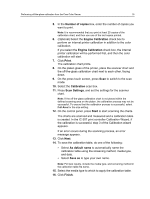
20 Chapter 3-Calibration Creating a calibration table using the X-Rite i1 spectrophotometer Requirements: ● Your spectrophotometer must be connected to the USB port on the IC-307 print controller. ● Install the driver when prompted for the first time connecting the device. Refer to the spectrophotometer product documentation for more details. ● Make sure that your spectrophotometer is calibrated by placing the spectrophotometer on its plate. ● Print a reference job and use the same media and screen type on which you will print the final job. ● The Print queue must be ready for printing (not suspended). ● Make sure the X-rite i1 spectrophotometer is selected in the Preferences window. 1. From the Tools menu, select Calibration. 2. In the Tray list, select the desired tray. The default tray is Tray 1. 3. In the Media Type list, select the desired media type-for example, Gloss Coated for Laser.You can print the calibration chart on any paper size that is equal to or larger than A4 or Letter. 4. In the Screening list, select the screening method. Note: Make sure that you set the screening method to the one you are going to use to print the job. 5. In the Number of copies box, type the number of copies you want to print. Note: It is recommended that you print at least 25 copies of the calibration chart, and then use one of the last copies printed. 6. (Optional) Select the Engine Calibration check box to perform an internal printer calibration in addition to the color calibration. If you select the Engine Calibration check box, the internal printer calibration will be performed first, and then the color calibration will start. 7. Click Print. The calibration chart is printed, and step 2 of the Color Calibration wizard appears. 8. Follow the instructions in the wizard.
-
 1
1 -
2
-
3
-
4
-
5
-
6
-
7
-
8
-
9
-
10
-
11
-
12
-
13
-
14
-
15
-
16
-
17
-
18
-
19
-
20
-
21
-
22
-
 23
23 -
 24
24 -
 25
25 -
 26
26 -
 27
27 -
 28
28 -
 29
29 -
 30
30 -
 31
31 -
 32
32 -
 33
33 -
34
-
35
-
36
-
37
-
38
-
39
-
40
-
41
-
42
-
43
-
44
-
45
-
46
-
47
-
48
-
49
-
50
-
51
-
52
-
53
-
54
-
55
-
56
-
57
-
58
-
59
-
60
-
61
-
62
-
63
-
64
-
65
-
66
-
67
-
68
-
69
-
70
-
71
-
72
-
73
-
74
-
75
-
76
-
77
-
78
-
79
-
80
-
81
-
82
-
83
-
84
-
85
-
86
-
87
-
88
-
89
-
90
-
91
-
92
-
93
-
94
-
95
-
96
-
97
-
98
-
99
-
100
-
101
-
102
-
103
-
104
-
105
-
106
-
107
-
108
-
109
-
110
-
111
-
112
-
113
-
114
-
115
-
116
-
117
-
118
-
119
-
120
-
121
-
122
-
123
-
124
-
125
-
126
-
127
-
128
-
129
-
130
-
131
-
132
-
133
-
134
-
135
-
136
-
137
-
138
-
139
-
140
-
141
-
142
-
143
-
144
-
145
-
146
-
147
-
148
-
149
-
150
-
151
-
152
-
153
-
154
-
155
-
156
-
157
-
158
-
159
-
160
-
161
-
162
-
163
-
164
-
165
-
166
-
167
-
168
-
169
-
170
-
171
-
172
-
173
-
174
-
175
-
176
-
177
-
178
-
179
-
180
-
181
-
182
-
183
-
184
-
185
-
186
-
187
-
188
-
189
-
190
-
191
-
192
-
193
-
194
-
195
-
196
 |
 |