Panasonic AG-HPD24PJ Operating Instructions - Page 24
Preparation, Charging the battery
 |
View all Panasonic AG-HPD24PJ manuals
Add to My Manuals
Save this manual to your list of manuals |
Page 24 highlights
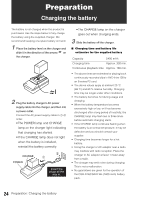
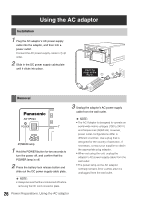
Preparation Charging the battery The battery is not charged when the product is purchased. Use the steps below to fully charge the battery using the supplied charger. We recommend keeping one spare battery on hand. 1 Place the battery level on the charger and slide it in the direction of the arrows on the charger. 2 Plug the battery charger's AC power supply cable into the charger, and then into a power outlet. Connect the AC power supply cable in A-B order. • The POWER lamp and CHARGE lamp on the charger light indicating that charging has started. • If the CHARGE lamp does not light when the battery is installed, reinstall the battery correctly. B CHARGE A POWER Insert the plugs all the way in. • The CHARGE lamp on the charger goes out when charging ends. 3 Slide the battery off the charger. ■ Charging time and battery life estimates for the supplied battery Capacity 5400 mAh Charging time Approx. 330 min. Continuous playback time Approx. 160 min. • The above times are estimates for playing back continuously recorded clips in AVC-Intra 100 to an E-series P2 card. • The above values apply at ambient 20 °C (68 °F) and 60 % relative humidity. Charging time may be longer under other conditions. • The battery becomes hot during usage and charging. • When the battery temperature becomes excessively high or low, or it has become discharged after a long period of inactivity, the CHARGE lamp may flash two or three times before automatic charging starts. • If the CHARGE lamp continues flashing when the battery is at normal temperature, it may be defective and you should contact your supplier. • Charging time becomes longer for a hot battery. • Using the charger or AC adaptor near a radio may interfere with radio reception. Place the charger or AC adaptor at least 1 meter away from a radio. • The charger may emit noise during charging. This is not a malfunction. • No guarantees are given for the operation of the CGR-D16/CGR-D16s (1600 mAh) battery pack. 24 Preparation: Charging the battery
-
 1
1 -
2
-
3
-
4
-
5
-
6
-
7
-
8
-
9
-
10
-
11
-
12
-
13
-
14
-
15
-
16
-
17
-
18
-
 19
19 -
 20
20 -
 21
21 -
 22
22 -
 23
23 -
 24
24 -
 25
25 -
 26
26 -
 27
27 -
 28
28 -
 29
29 -
30
-
31
-
32
-
33
-
34
-
35
-
36
-
37
-
38
-
39
-
40
-
41
-
42
-
43
-
44
-
45
-
46
-
47
-
48
-
49
-
50
-
51
-
52
-
53
-
54
-
55
-
56
-
57
-
58
-
59
-
60
-
61
-
62
-
63
-
64
-
65
-
66
-
67
-
68
-
69
-
70
-
71
-
72
-
73
-
74
-
75
-
76
-
77
-
78
-
79
-
80
-
81
-
82
-
83
-
84
-
85
-
86
-
87
-
88
-
89
-
90
-
91
-
92
-
93
-
94
-
95
-
96
-
97
-
98
-
99
-
100
-
101
-
102
-
103
-
104
-
105
-
106
-
107
-
108
-
109
-
110
-
111
-
112
-
113
-
114
-
115
-
116
-
117
-
118
-
119
-
120
-
121
-
122
-
123
-
124
-
125
-
126
-
127
-
128
-
129
-
130
-
131
-
132
-
133
-
134
-
135
-
136
-
137
-
138
-
139
-
140
-
141
-
142
-
143
-
144
-
145
-
146
-
147
-
148
-
149
-
150
-
151
-
152
-
153
-
154
-
155
-
156
-
157
-
158
-
159
-
160
-
161
 |
 |
