Panasonic AG-HPD24PJ Operating Instructions - Page 93
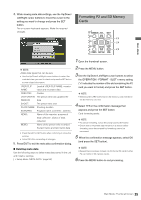
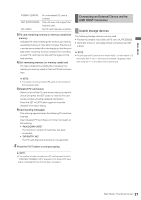
Exporting data by card to a storage device, Connecting a Storage Device
 |
View all Panasonic AG-HPD24PJ manuals
Add to My Manuals
Save this manual to your list of manuals |
Page 93 highlights
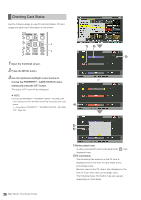
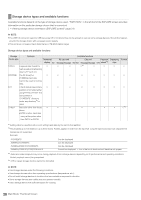
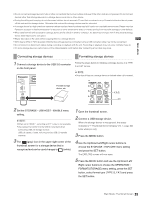
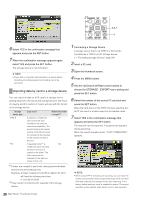
5,6,7 4 6 Select YES in the confirmation message that appears and press the SET button. 7 When the confirmation message appears again, select YES and press the SET button. The storage device is now formatted. ◆ NOTE: • Check that no important data remains on a device before formatting since data erased by formatting cannot be recovered. Exporting data by card to a storage device You can export all data on a P2 card to a storage device (writing data from a P2 card to the storage device). The result of copying and the number of copies will vary with the format of the storage device. Storage device type TYPE S FAT Copy result Maximum number of copies*2 A partition is created by 23 card and all the data included in the card are copied to that partition. The product number and serial number of the P2 card used for copying can be checked on the explorer screen of this unit. A separate folder*1 is 100 created for each card and all data on the card is copied to this folder. The folder name can be checked on the explorer screen of this unit. *1Folders are created in two levels: date (year/month/date), and time (hour/minute/second). Example: A folder created at 12:34:56 on March 30, 2011 will have the following structure: /11-03-30/12-34-56 *2Copy volume is limited by the capacity of the storage device. 1 Connecting a Storage Device A storage device that is not TYPE S or FAT will be formatted as a TYPE S or FAT storage device. (➝ "Formatting storage devices" page 29) 2 Insert a P2 card. 3 Open the thumbnail screen. 4 Press the MENU button. 5 Use the Up/Down/Left/Right cursor buttons to choose the STORAGE - EXPORT menu setting and press the SET button. 6 Select the number of the source P2 card slot and press the SET button. When the hard disk is in the TYPE S format, selecting ALL SLOT will result in a batch export of all inserted cards. 7 Select YES in the confirmation message that appears and press the SET button. The data will now be exported. A progress bar appears during exporting. When the export operation ends, "COPY COMPLETED!" appears. ◆ NOTE: • When using TYPE S formatting for exporting, you can have the system automatically verify (compare) the original P2 card data with data copied to the storage device after exporting. In the factory default settings, verify is enabled for export. The export operation will end earlier when Verify is not on and exported 30 Main Mode: Thumbnail Screen
-
 1
1 -
2
-
3
-
4
-
5
-
6
-
7
-
8
-
9
-
10
-
11
-
12
-
13
-
14
-
15
-
16
-
17
-
18
-
19
-
20
-
21
-
22
-
23
-
24
-
25
-
26
-
27
-
28
-
29
-
30
-
31
-
32
-
33
-
34
-
35
-
36
-
37
-
38
-
39
-
40
-
41
-
42
-
43
-
44
-
45
-
46
-
47
-
48
-
49
-
50
-
51
-
52
-
53
-
54
-
55
-
56
-
57
-
58
-
59
-
60
-
61
-
62
-
63
-
64
-
65
-
66
-
67
-
68
-
69
-
70
-
71
-
72
-
73
-
74
-
75
-
76
-
77
-
78
-
79
-
80
-
81
-
82
-
83
-
84
-
85
-
86
-
87
-
 88
88 -
 89
89 -
 90
90 -
 91
91 -
 92
92 -
 93
93 -
 94
94 -
 95
95 -
 96
96 -
 97
97 -
 98
98 -
99
-
100
-
101
-
102
-
103
-
104
-
105
-
106
-
107
-
108
-
109
-
110
-
111
-
112
-
113
-
114
-
115
-
116
-
117
-
118
-
119
-
120
-
121
-
122
-
123
-
124
-
125
-
126
-
127
-
128
-
129
-
130
-
131
-
132
-
133
-
134
-
135
-
136
-
137
-
138
-
139
-
140
-
141
-
142
-
143
-
144
-
145
-
146
-
147
-
148
-
149
-
150
-
151
-
152
-
153
-
154
-
155
-
156
-
157
-
158
-
159
-
160
-
161
 |
 |
