Panasonic AG-HPD24PJ Operating Instructions - Page 95
Connecting a Storage Device., and press the SET button.
 |
View all Panasonic AG-HPD24PJ manuals
Add to My Manuals
Save this manual to your list of manuals |
Page 95 highlights
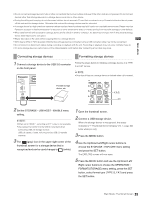
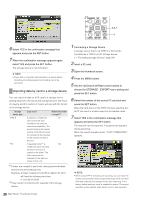
1 Connecting a Storage Device. 2 Open the thumbnail screen. 3 Press the MENU button. 4 Use the Up/Down/Left/Right cursor buttons to choose the STORAGE - EXPLORE menu setting and press the SET button. The EXPLORE screen appears. 3) 1) 4) 2) 1) Display status Indicates that the name of the screen is the EXPLORE screen for the storage device. 2) Device information The following information appears. Storage PARTITION: device that VENDOR: makes it MODEL: possible to SIZE: read and write data by USED: card (TYPE S, P2 STORE). FREE CAP.: TYPE S / P2 STORE Name of vendor Model name Total capacity (unit: GB) Memory used (unit: GB) Used P2 card area (unit: cards) up to 23 cards Remaining capacity (Unit: GB) SELECTED PART.: Number of selected partitions Storage PARTITION: FAT/OTHER device other than above (FAT, OTHER) VENDOR: MODEL: SIZE: FREE CAP.: Name of vendor Model name Total capacity (unit: GB) Remaining capacity (Unit: GB) SELECTED PART.: Number of selected folders 3) Partition information (for a TYPE S storage device or P2 store disk) : Check marks appear for selected partition. NUMBER(NO.): MODEL: PARTITION NAME: DATE / TIME: SERIAL: Partition number (1 - ) P2 card model name Name assigned to partition (➝ "Entering a partition name" page 33) Date and time of partition recording P2 card serial number Folder information (for a FAT type storage device) : NUMBER(NO.): FOLDER NAME: DATE / TIME: Check marks appear for selected folder. Folder number (1 - ) Folder name (does not include CONTENTS folders) Folder creation date ◆ NOTE: • Use the Left/Right cursor buttons to toggle between the partition names and serial names for TYPE S formatted storage devices. • The partition information for an invalid partition on a P2 store is indicated in gray. • Select the PROPERTY - FREE CAP. OF PARTITION menu setting in the menu to check the remaining capacity of the partition. 4) Storage device indicator Indicates whether or not a storage device is connected and device type. ■ Operations in the EXPLORE screen Selecting partition or folder as target Selecting a partition or folder as target allows you to display all the clips in the selected partition or folder as thumbnails. (➝ "Thumbnail Screen Display" Vol. 1, page 34) Use the following steps to select up to six partitions or folders to use in this way. 2 1 1. Select a partition or folder in the EXPLORE screen. 2. Hold down the SET button (1 sec or longer) to complete the operation. A check mark appears on next to the selected partition or folder. 32 Main Mode: Thumbnail Screen
-
 1
1 -
2
-
3
-
4
-
5
-
6
-
7
-
8
-
9
-
10
-
11
-
12
-
13
-
14
-
15
-
16
-
17
-
18
-
19
-
20
-
21
-
22
-
23
-
24
-
25
-
26
-
27
-
28
-
29
-
30
-
31
-
32
-
33
-
34
-
35
-
36
-
37
-
38
-
39
-
40
-
41
-
42
-
43
-
44
-
45
-
46
-
47
-
48
-
49
-
50
-
51
-
52
-
53
-
54
-
55
-
56
-
57
-
58
-
59
-
60
-
61
-
62
-
63
-
64
-
65
-
66
-
67
-
68
-
69
-
70
-
71
-
72
-
73
-
74
-
75
-
76
-
77
-
78
-
79
-
80
-
81
-
82
-
83
-
84
-
85
-
86
-
87
-
88
-
89
-
 90
90 -
 91
91 -
 92
92 -
 93
93 -
 94
94 -
 95
95 -
 96
96 -
 97
97 -
 98
98 -
 99
99 -
 100
100 -
101
-
102
-
103
-
104
-
105
-
106
-
107
-
108
-
109
-
110
-
111
-
112
-
113
-
114
-
115
-
116
-
117
-
118
-
119
-
120
-
121
-
122
-
123
-
124
-
125
-
126
-
127
-
128
-
129
-
130
-
131
-
132
-
133
-
134
-
135
-
136
-
137
-
138
-
139
-
140
-
141
-
142
-
143
-
144
-
145
-
146
-
147
-
148
-
149
-
150
-
151
-
152
-
153
-
154
-
155
-
156
-
157
-
158
-
159
-
160
-
161
 |
 |
