Panasonic AG-HPD24PJ Operating Instructions - Page 79
Selecting and Deselecting Clips, Attaching Text Memos and Shot Marks, Selecting clips
 |
View all Panasonic AG-HPD24PJ manuals
Add to My Manuals
Save this manual to your list of manuals |
Page 79 highlights
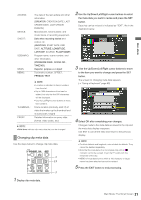
4 When the cursor is in the lower half of the monitor, use the Left/Right cursor buttons to select the thumbnail with the text memo you want to play and press the PLAY button. The clip is played back from the text memo time code location selected with the cursor. When you press the STOP button to interrupt ongoing playback, or when playback stops upon reaching the end of the clip, the thumbnail screen reappears and the cursor returns to the thumbnail text memo location where playback was started. Press the EXIT button to return the cursor to the top of the thumbnail screen. 2 Press the SET button. A blue frame appears on the clip selected with the cursor to indicate that it is selected. ◆ NOTE: • During playback all buttons other than the STOP not available. button are Selecting and Deselecting Clips Select clips you want to process on the thumbnail screen. ◆ NOTE: • Repeat steps 1 and 2 to select multiple clips. • After selecting a clip, move the cursor to another clip, hold down the SHIFT button and press the SET button to select another clip. This method allows you to select the two clips as well as all the clips between them. • Selecting a clip updates the number of selected clips shown in the lower right corner of the screen. Selecting clips Deselecting clips 2 1 1 1 Use the Up/Down/Left/Right cursor buttons to place the yellow frame (cursor) on the desired clip. ◆ NOTE: • Press the TOP/BOTTOM button to move the cursor to the first or last clip. 1 Place the cursor on a selected clip and press the SET button again. This cancels the selection. ◆ NOTE: • Press the CANCEL button to deselect selected clips. Attaching Text Memos and Shot Marks A text memo can be attached in a clip to mark a specific location. The user can attach shot marks to distinguish clips from each other. Clips on P2 cards where the write-protect switch is set to PROTECT cannot be added. 16 Main Mode: Thumbnail Screen
-
 1
1 -
2
-
3
-
4
-
5
-
6
-
7
-
8
-
9
-
10
-
11
-
12
-
13
-
14
-
15
-
16
-
17
-
18
-
19
-
20
-
21
-
22
-
23
-
24
-
25
-
26
-
27
-
28
-
29
-
30
-
31
-
32
-
33
-
34
-
35
-
36
-
37
-
38
-
39
-
40
-
41
-
42
-
43
-
44
-
45
-
46
-
47
-
48
-
49
-
50
-
51
-
52
-
53
-
54
-
55
-
56
-
57
-
58
-
59
-
60
-
61
-
62
-
63
-
64
-
65
-
66
-
67
-
68
-
69
-
70
-
71
-
72
-
73
-
 74
74 -
 75
75 -
 76
76 -
 77
77 -
 78
78 -
 79
79 -
 80
80 -
 81
81 -
 82
82 -
 83
83 -
 84
84 -
85
-
86
-
87
-
88
-
89
-
90
-
91
-
92
-
93
-
94
-
95
-
96
-
97
-
98
-
99
-
100
-
101
-
102
-
103
-
104
-
105
-
106
-
107
-
108
-
109
-
110
-
111
-
112
-
113
-
114
-
115
-
116
-
117
-
118
-
119
-
120
-
121
-
122
-
123
-
124
-
125
-
126
-
127
-
128
-
129
-
130
-
131
-
132
-
133
-
134
-
135
-
136
-
137
-
138
-
139
-
140
-
141
-
142
-
143
-
144
-
145
-
146
-
147
-
148
-
149
-
150
-
151
-
152
-
153
-
154
-
155
-
156
-
157
-
158
-
159
-
160
-
161
 |
 |
