Panasonic AG-HPD24PJ Operating Instructions - Page 97
Press the MENU button., on a storage device.
 |
View all Panasonic AG-HPD24PJ manuals
Add to My Manuals
Save this manual to your list of manuals |
Page 97 highlights
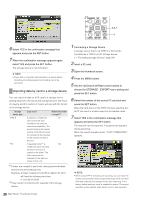
NUMBER (NO.): Folder no. (1 - ) DATE / TIME: Date and time of folder created FOLDER: Folder name *1 SIZE / FREE CAP.: Storage device capacity/remaining capacity *1: Date created is not shown for root. SET EXIT 1) 2) 1) Clip information Displays clip properties. 2) Storage device information TYPE S device SERIAL: P2 card serial number MODEL: P2 card model name SELECTED PART.: A check mark partition. appears for the selected SELECTED PART. No.: This indication appears only when multiple partitions are selected and a list of numbers of selected partitions is displayed. NUMBER (NO.): Partition no. (1 - ) DATE / TIME: Date and time of partition recording VERIFY: Verify setting and result of verification ON: FINISHED Verification was successful ON: FAILED Verification failed • "- -" is displayed on P2 store. OFF: No verification was performed NAME: User assigned partition name SIZE / USED / Total storage device capacity/used capacity/ FREE CAP.: remaining capacity FAT formatted device SELECTED PART.: SELECTED PART. No.: A check mark partition. appears for the selected This indication appears only when multiple folders are selected and a list of numbers of selected folders is displayed. ◆ NOTE: • Use the SHIFT and +/- buttons to move to thumbnail displays on adjacent partitions or folders without returning to the EXPLORE screen. • Change the thumbnail screen display as necessary. These changes are performed in the same way as when using P2 cards. (➝ "Changing Thumbnail Display" page 12) • There is a limit of 1000 clips and clips that exceed this limit will not be displayed. Viewing Clip Information Use the steps below to view a variety of meta data on clips stored on a storage device. It shows information in the same way as the P2 card clip property. 1. Move the cursor to select a clip in a thumbnail screen on a storage device. 2. Press the MENU button. 3. Use the Up/Down/Left/Right cursor buttons to choose the PROPERTY - CLIP PROPERTY menu setting and press the SET button. (➝ "Viewing and Revising Clip Information" page 20) But repairs cannot be made. Deleting Clips Use the steps below to delete clips that are no longer necessary on a storage device. 1. Select a clip to delete on the thumbnail screen on a storage device. 2. Press the MENU button. 3. Use the Up/Down/Left/Right cursor buttons to choose the OPERATION - DELETE menu setting and press the SET button. 4. Select YES in the confirmation message that appears and press the SET button. ◆ NOTE: • It may not be possible to delete clips with the indicator) and (unknown clip indicator). (bad clip 34 Main Mode: Thumbnail Screen
-
 1
1 -
2
-
3
-
4
-
5
-
6
-
7
-
8
-
9
-
10
-
11
-
12
-
13
-
14
-
15
-
16
-
17
-
18
-
19
-
20
-
21
-
22
-
23
-
24
-
25
-
26
-
27
-
28
-
29
-
30
-
31
-
32
-
33
-
34
-
35
-
36
-
37
-
38
-
39
-
40
-
41
-
42
-
43
-
44
-
45
-
46
-
47
-
48
-
49
-
50
-
51
-
52
-
53
-
54
-
55
-
56
-
57
-
58
-
59
-
60
-
61
-
62
-
63
-
64
-
65
-
66
-
67
-
68
-
69
-
70
-
71
-
72
-
73
-
74
-
75
-
76
-
77
-
78
-
79
-
80
-
81
-
82
-
83
-
84
-
85
-
86
-
87
-
88
-
89
-
90
-
91
-
 92
92 -
 93
93 -
 94
94 -
 95
95 -
 96
96 -
 97
97 -
 98
98 -
 99
99 -
 100
100 -
 101
101 -
 102
102 -
103
-
104
-
105
-
106
-
107
-
108
-
109
-
110
-
111
-
112
-
113
-
114
-
115
-
116
-
117
-
118
-
119
-
120
-
121
-
122
-
123
-
124
-
125
-
126
-
127
-
128
-
129
-
130
-
131
-
132
-
133
-
134
-
135
-
136
-
137
-
138
-
139
-
140
-
141
-
142
-
143
-
144
-
145
-
146
-
147
-
148
-
149
-
150
-
151
-
152
-
153
-
154
-
155
-
156
-
157
-
158
-
159
-
160
-
161
 |
 |
