Roxio Creator 2010 Product Manual - Page 110
Send to Portable Device, Auto Trim Silence
 |
View all Roxio Creator 2010 manuals
Add to My Manuals
Save this manual to your list of manuals |
Page 110 highlights
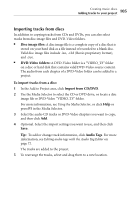
110 Roxio Creator User Guide www.roxio.com To manually beatmatch your track(s): 1 Select the tracks you want to manually beatmatch, then select the Beatmatch option from the drop-down menu in the Transition column. Music Disc Creator will then scan all selected tracks, and analyze the BPM. When the scan is complete, the BPM for each selected track will appear in the BPM column. 2 Trim the silence from the beginning and end of your tracks by rightclicking on the tracks and selecting Auto Trim Silence. 3 Sort the tracks according to BPM by clicking the BPM column header. 4 Set the transition time by typing the number of seconds to transition from one track to the next. Tip: As a general rule, it is recommended that you set the Beatmatching transition to 20 seconds or more. If there is a significant difference in BPM between two tracks, the transition will need to be longer. 5 Click any speaker icon in the Transition column to hear how the transition between the selected track and the previous track will sound. When you are satisfied with the transitions between the tracks in your track list, you are ready to export the track list to CD, or to your connected portable device. 6 Select an export option from the Export task pane. Note If you click either Send to Portable Device, or Export, an options dialog will appear. Be sure to select Combine all files into one file, including transitions, or your transitions will be lost.
-
 1
1 -
2
-
3
-
4
-
5
-
6
-
7
-
8
-
9
-
10
-
11
-
12
-
13
-
14
-
15
-
16
-
17
-
18
-
19
-
20
-
21
-
22
-
23
-
24
-
25
-
26
-
27
-
28
-
29
-
30
-
31
-
32
-
33
-
34
-
35
-
36
-
37
-
38
-
39
-
40
-
41
-
42
-
43
-
44
-
45
-
46
-
47
-
48
-
49
-
50
-
51
-
52
-
53
-
54
-
55
-
56
-
57
-
58
-
59
-
60
-
61
-
62
-
63
-
64
-
65
-
66
-
67
-
68
-
69
-
70
-
71
-
72
-
73
-
74
-
75
-
76
-
77
-
78
-
79
-
80
-
81
-
82
-
83
-
84
-
85
-
86
-
87
-
88
-
89
-
90
-
91
-
92
-
93
-
94
-
95
-
96
-
97
-
98
-
99
-
100
-
101
-
102
-
103
-
104
-
 105
105 -
 106
106 -
 107
107 -
 108
108 -
 109
109 -
 110
110 -
 111
111 -
 112
112 -
 113
113 -
 114
114 -
 115
115 -
116
-
117
-
118
-
119
-
120
-
121
-
122
-
123
-
124
-
125
-
126
-
127
-
128
-
129
-
130
-
131
-
132
-
133
-
134
-
135
-
136
-
137
-
138
-
139
-
140
-
141
-
142
-
143
-
144
-
145
-
146
-
147
-
148
-
149
-
150
-
151
-
152
-
153
-
154
-
155
-
156
-
157
-
158
-
159
-
160
-
161
-
162
-
163
-
164
-
165
-
166
-
167
-
168
-
169
-
170
-
171
-
172
-
173
-
174
-
175
-
176
-
177
-
178
-
179
-
180
-
181
-
182
-
183
-
184
-
185
-
186
-
187
-
188
-
189
-
190
-
191
-
192
-
193
-
194
-
195
-
196
-
197
-
198
-
199
-
200
-
201
-
202
-
203
-
204
-
205
-
206
-
207
-
208
-
209
-
210
-
211
-
212
-
213
-
214
-
215
-
216
-
217
-
218
-
219
-
220
-
221
-
222
-
223
-
224
-
225
-
226
-
227
-
228
-
229
-
230
-
231
-
232
-
233
-
234
-
235
-
236
-
237
-
238
-
239
-
240
 |
 |