Roxio Creator 2010 Product Manual - Page 204
Features available in both views, Preview area, Production Editor, Disc size, Project size bar
 |
View all Roxio Creator 2010 manuals
Add to My Manuals
Save this manual to your list of manuals |
Page 204 highlights
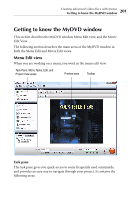
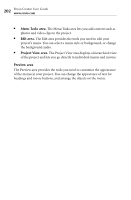
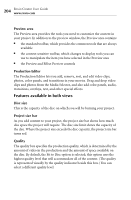
204 Roxio Creator User Guide www.roxio.com Preview area The Preview area provides the tools you need to customize the content in your project. In addition to the preview window, the Preview area contains: ■ the standard toolbar, which provides the common tools that are always available ■ the context-sensitive toolbar, which changes to display tools you can use to manipulate the item you have selected in the Preview area ■ the Preview and Effect Preview controls Production Editor The Production Editor lets you add, remove, sort, and edit video clips, photos, color panels, and transitions in your movies. Drag and drop video clips and photos from the Media Selector, and also add color panels, audio, transitions, overlays, text, and other special effects. Features available in both views Disc size This is the capacity of the disc on which you will be burning your project. Project size bar As you add content to your project, the project size bar shows how much disc space the project will require. The disc size limit shows the capacity of the disc. Where the project size exceeds the disc capacity, the project size bar turns red. Quality The quality box specifies the production quality, which is determined by the amount of video in the production and the amount of space available on the disc. By default, the Fit to Disc option is selected; this option uses the highest quality level that will accommodate all of the content. (The quality is represented visually by the quality indicator beside this box.) You can select a different quality level.
-
 1
1 -
2
-
3
-
4
-
5
-
6
-
7
-
8
-
9
-
10
-
11
-
12
-
13
-
14
-
15
-
16
-
17
-
18
-
19
-
20
-
21
-
22
-
23
-
24
-
25
-
26
-
27
-
28
-
29
-
30
-
31
-
32
-
33
-
34
-
35
-
36
-
37
-
38
-
39
-
40
-
41
-
42
-
43
-
44
-
45
-
46
-
47
-
48
-
49
-
50
-
51
-
52
-
53
-
54
-
55
-
56
-
57
-
58
-
59
-
60
-
61
-
62
-
63
-
64
-
65
-
66
-
67
-
68
-
69
-
70
-
71
-
72
-
73
-
74
-
75
-
76
-
77
-
78
-
79
-
80
-
81
-
82
-
83
-
84
-
85
-
86
-
87
-
88
-
89
-
90
-
91
-
92
-
93
-
94
-
95
-
96
-
97
-
98
-
99
-
100
-
101
-
102
-
103
-
104
-
105
-
106
-
107
-
108
-
109
-
110
-
111
-
112
-
113
-
114
-
115
-
116
-
117
-
118
-
119
-
120
-
121
-
122
-
123
-
124
-
125
-
126
-
127
-
128
-
129
-
130
-
131
-
132
-
133
-
134
-
135
-
136
-
137
-
138
-
139
-
140
-
141
-
142
-
143
-
144
-
145
-
146
-
147
-
148
-
149
-
150
-
151
-
152
-
153
-
154
-
155
-
156
-
157
-
158
-
159
-
160
-
161
-
162
-
163
-
164
-
165
-
166
-
167
-
168
-
169
-
170
-
171
-
172
-
173
-
174
-
175
-
176
-
177
-
178
-
179
-
180
-
181
-
182
-
183
-
184
-
185
-
186
-
187
-
188
-
189
-
190
-
191
-
192
-
193
-
194
-
195
-
196
-
197
-
198
-
 199
199 -
 200
200 -
 201
201 -
 202
202 -
 203
203 -
 204
204 -
 205
205 -
 206
206 -
 207
207 -
 208
208 -
 209
209 -
210
-
211
-
212
-
213
-
214
-
215
-
216
-
217
-
218
-
219
-
220
-
221
-
222
-
223
-
224
-
225
-
226
-
227
-
228
-
229
-
230
-
231
-
232
-
233
-
234
-
235
-
236
-
237
-
238
-
239
-
240
 |
 |