Roxio Creator 2010 Product Manual - Page 197
Archiving AVCHD video
 |
View all Roxio Creator 2010 manuals
Add to My Manuals
Save this manual to your list of manuals |
Page 197 highlights
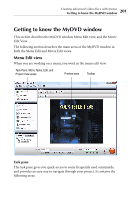
Video tools and assistants Archiving AVCHD video 197 Archiving AVCHD video AVCHD Archive is a great way to back up the high quality video shot with your AVCHD camcorder. This simple task assistant saves video from an AVCHD recorder onto DVD or Blu-ray discs. There's no reformatting or transcoding. Your discs will contain the same high definition video as your camera and can be used to add content to all the great video projects available with Creator. To transfer AVCHD video: 1 Connect your AVCHD camera to your computer using the cable supplied with the camera. 2 Turn the camera on and set it to the correct mode to play back saved video. For more information, check the documentation for your camera. 3 Use Roxio Home to launch AVCHD Archive. From Roxio Home, click the Video - Movies project tab, then click Archive AVCHD. The main window of AVCHD Archive has a From box on the left that you will use to select and preview your source material. On the right is a To box with a drop-down menu you will use to select a DVD or Bluray Disc burner. 4 Click on the From drop-down list and select your AVCHD camera. You can also choose to copy AVCHD content stored on a hard disk. The source material will be listed in the From box, based on the playlist found in your AVCHD camcorder or folder. 5 Put an X in the checkbox of each movie you want to copy. To select all the movies at once, click Select All. 6 Optional: To preview a movie, click on its title or thumbnail image, and click the Preview button. 7 Place a blank DVD or Blu-ray disc in the disc drive you plan to use for this project. (You can use a rewritable disc that already contains content, but the disc will be erased before your new video files are archived.) 8 Select the disc drive in the To drop-down list.
-
 1
1 -
2
-
3
-
4
-
5
-
6
-
7
-
8
-
9
-
10
-
11
-
12
-
13
-
14
-
15
-
16
-
17
-
18
-
19
-
20
-
21
-
22
-
23
-
24
-
25
-
26
-
27
-
28
-
29
-
30
-
31
-
32
-
33
-
34
-
35
-
36
-
37
-
38
-
39
-
40
-
41
-
42
-
43
-
44
-
45
-
46
-
47
-
48
-
49
-
50
-
51
-
52
-
53
-
54
-
55
-
56
-
57
-
58
-
59
-
60
-
61
-
62
-
63
-
64
-
65
-
66
-
67
-
68
-
69
-
70
-
71
-
72
-
73
-
74
-
75
-
76
-
77
-
78
-
79
-
80
-
81
-
82
-
83
-
84
-
85
-
86
-
87
-
88
-
89
-
90
-
91
-
92
-
93
-
94
-
95
-
96
-
97
-
98
-
99
-
100
-
101
-
102
-
103
-
104
-
105
-
106
-
107
-
108
-
109
-
110
-
111
-
112
-
113
-
114
-
115
-
116
-
117
-
118
-
119
-
120
-
121
-
122
-
123
-
124
-
125
-
126
-
127
-
128
-
129
-
130
-
131
-
132
-
133
-
134
-
135
-
136
-
137
-
138
-
139
-
140
-
141
-
142
-
143
-
144
-
145
-
146
-
147
-
148
-
149
-
150
-
151
-
152
-
153
-
154
-
155
-
156
-
157
-
158
-
159
-
160
-
161
-
162
-
163
-
164
-
165
-
166
-
167
-
168
-
169
-
170
-
171
-
172
-
173
-
174
-
175
-
176
-
177
-
178
-
179
-
180
-
181
-
182
-
183
-
184
-
185
-
186
-
187
-
188
-
189
-
190
-
191
-
 192
192 -
 193
193 -
 194
194 -
 195
195 -
 196
196 -
 197
197 -
 198
198 -
 199
199 -
 200
200 -
 201
201 -
 202
202 -
203
-
204
-
205
-
206
-
207
-
208
-
209
-
210
-
211
-
212
-
213
-
214
-
215
-
216
-
217
-
218
-
219
-
220
-
221
-
222
-
223
-
224
-
225
-
226
-
227
-
228
-
229
-
230
-
231
-
232
-
233
-
234
-
235
-
236
-
237
-
238
-
239
-
240
 |
 |