Samsung SHR-5162 User Manual - Page 21
Setting Audio On/off
 |
View all Samsung SHR-5162 manuals
Add to My Manuals
Save this manual to your list of manuals |
Page 21 highlights
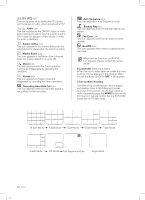
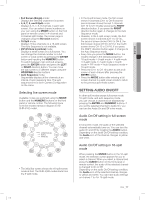
Full Screen (Single) mode: Displays the selected channel in full screen. 4, 6, 7, 8, and 9 Split mode: Displays 4, 6, 7, 8, 9 channels in each split screen. You can select channel numbers on your own using the MODE button on the front panel or remote control. In 4-channel and 9-channel split modes, the screen page is changed using the Direction buttons. 16 Split mode: Displays 16 live channels on a 16-split screen. The Auto Sequence is not available. PIP (Picture in picture) mode: Displays a small screen on a full screen. You can change the channel number on a full screen or small screen by pressing the ENTER button and inputting the NUMERIC button. To switch between main and sub screens, press the ENTER button and press the LEFT or RIGHT direction button. You can move the sub screen to 5 different stages using the UP/DOWN direction buttons. Auto Sequence mode: Sequentially displays all the channels at an interval of auto sequence time. The auto sequence time is set in Camera Configuration on the menu. Selecting live screen mode Available modes are switched using the MODE button and the NUMERIC buttons on the front panel or remote control. The following figure is the live modes transition diagram in the SHR-5162 model. The initial live screen shows the 16-split screen mode at first. The SHR-5082 model starts from the 9-split mode. SHR-5162_Eng.indb 17 In the 9-split screen mode, the first screen shows 9 channels (CH 1 to CH 9) and the second screen shows the rest 7 channels (CH 10 to CH 16) after pressing the RIGHT direction button. If you press the RIGHT direction button again, it changes to the Auto Sequence mode. Likewise, in the 4-split screen mode, the first screen shows 4 channels (CH 1 to CH 4), the second screen shows CH 5 to CH 8, the third screen shows CH 9 to CH 12, the fourth screen shows CH 13 to CH 16. If you press the RIGHT direction button again, it changes to the Auto Sequence mode. Every time you press the MODE button, the modes change in the following sequence: 16-split mode 9-split mode 4-split mode 6-split mode 7-split mode 8-split mode PIP mode Auto Sequence mode 16-split mode. Press the CH 1 to CH 16 button to see a full screen of each channel after pressing the ENTER button. Press the MODE button after entering a full screen channel in a split screen mode to return to the previous split mode screen. SETTING AUDIO ON/OFF In other split modes except full screen mode, 16-split mode, and auto sequence mode, you can choose a channel to be displayed by pressing the ENTER and NUMERIC buttons. If you set the selected channel to Audio On, you can turn the Audio On and Off in live mode. Audio On/Off setting in full screen mode In full screen mode, the audio of the selected channel automatically turns on. You can turn the audio On and Off by toggling the AUDIO button. Depending on the audio On/Off setting condition, the Audio icon of the channel changes to yellow and white. Audio On/Off setting in 16-split mode When pressing the ENTER button in the 16-split mode, the selection cursor appears for you to select a channel. When you select a channel and press the AUDIO button on the front panel or remote control, the audio of the selected channel is changed to On or Off. Depending on the audio On/Off setting condition, the Audio icon of the selected channel changes to yellow and white. You can have audio settings on channel 1 to 4 in 16-split mode. live _17 2007-06-18 11:48:04 04 LIVE
-
 1
1 -
2
-
3
-
4
-
5
-
6
-
7
-
8
-
9
-
10
-
11
-
12
-
13
-
14
-
15
-
 16
16 -
 17
17 -
 18
18 -
 19
19 -
 20
20 -
 21
21 -
 22
22 -
 23
23 -
 24
24 -
 25
25 -
 26
26 -
27
-
28
-
29
-
30
-
31
-
32
-
33
-
34
-
35
-
36
-
37
-
38
-
39
-
40
-
41
-
42
-
43
-
44
-
45
-
46
-
47
-
48
-
49
-
50
-
51
-
52
-
53
-
54
-
55
-
56
-
57
-
58
-
59
-
60
-
61
-
62
-
63
-
64
-
65
-
66
-
67
-
68
-
69
-
70
-
71
-
72
-
73
-
74
-
75
-
76
-
77
-
78
-
79
-
80
-
81
-
82
-
83
-
84
-
85
-
86
-
87
-
88
-
89
-
90
-
91
-
92
-
93
 |
 |
