Samsung SHR-5162 User Manual - Page 57
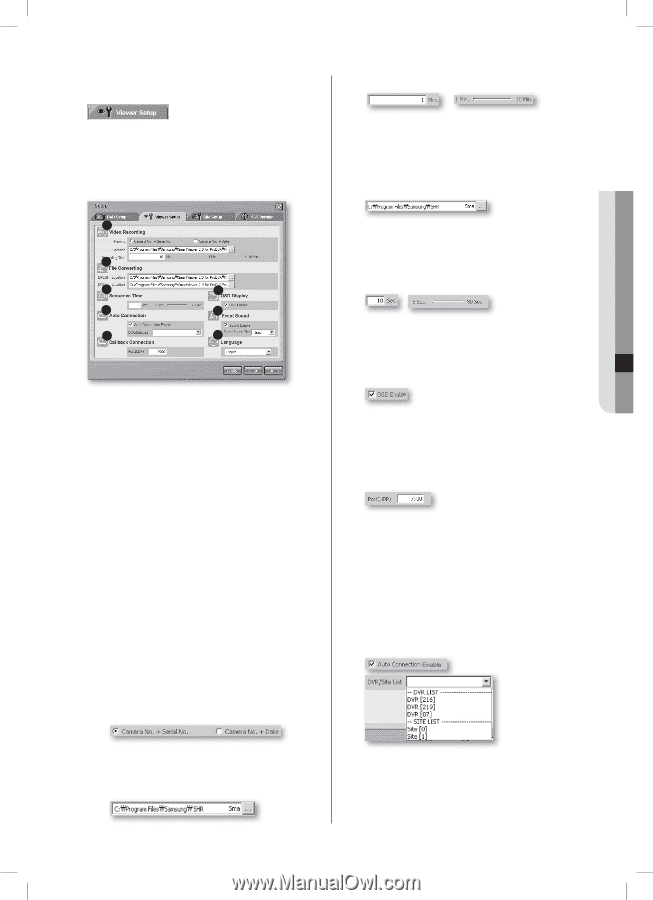
Viewer Setup
 |
View all Samsung SHR-5162 manuals
Add to My Manuals
Save this manual to your list of manuals |
Page 57 highlights
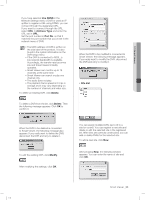
Viewer Setup Click Viewer Setup for configuring the Smart Viewer related settings. This Viewer Setup consists of 5 different items: Video Recording, File Converting, Sequence Time, OSD Display, and Auto Connection. 1 2 3 4 5 6 7 8 1. The currently displayed video data can be saved in a DVR format (*.dvr) file. The related settings are made here. 2. A DVR file can be converted into a JPEG or AVI file. The destination folders are determined here. 3. You can set the sequence time (or screen change time) interval for the auto sequence mode. 4. The OSD display on Smart Viewer can be decided here. 5. You can decide whether Smart Viewer automatically connects to the designated DVR or site when it starts running. 6. You can enable/disable alarming and set the alarming duration. 7. You can set the port for callback connection. 8. You can set the language for display. Video Recording - Naming convention When recording the currently displayed video data into DVR files, you can assign the file naming rule to DRV files. - Location 5162/5082 SHR-5162_Eng.indb 53 - Recording Time You can set the maximum recording time when saving the video data. You can set the time ranging from 1 to 10 minutes. If the recording time exceeds the preset value, the program stops recording. File Converting 5162/5082 You can convert a DVR file saved on your PC into JPEG or AVI. The default destination folder for file conversion is < Smart Viewer directory>\ frame." You can change it on your own. Sequence Time In monitoring mode, when the screen change (auto sequence) mode is active, the camera channels change at an interval of this time. You can set the time ranging from 5 to 30 seconds. OSD Display You can set if OSD shall be displayed on each channel of Smart Viewer. However, the icons for audio, PTZ, recording, and alarm/motion event are normally displayed regardless of this setting. Callback Connection Set the port for callback connection. Auto Connection You can set if Smart Viewer is automatically connected to the selected DVR or site when starting the program. If you check Auto Connection Enable, available DVRs and sites are displayed in the pull-down list. After selecting one from the list, Smart Viewer connects to the selected DVR or site whenever it is started. Smart Viewer _53 2007-06-18 11:49:51 10 Smart Viewer
-
 1
1 -
2
-
3
-
4
-
5
-
6
-
7
-
8
-
9
-
10
-
11
-
12
-
13
-
14
-
15
-
16
-
17
-
18
-
19
-
20
-
21
-
22
-
23
-
24
-
25
-
26
-
27
-
28
-
29
-
30
-
31
-
32
-
33
-
34
-
35
-
36
-
37
-
38
-
39
-
40
-
41
-
42
-
43
-
44
-
45
-
46
-
47
-
48
-
49
-
50
-
51
-
 52
52 -
 53
53 -
 54
54 -
 55
55 -
 56
56 -
 57
57 -
 58
58 -
 59
59 -
 60
60 -
 61
61 -
 62
62 -
63
-
64
-
65
-
66
-
67
-
68
-
69
-
70
-
71
-
72
-
73
-
74
-
75
-
76
-
77
-
78
-
79
-
80
-
81
-
82
-
83
-
84
-
85
-
86
-
87
-
88
-
89
-
90
-
91
-
92
-
93
 |
 |