Samsung SHR-5162 User Manual - Page 65
NEXT Button, CALLBACK Button, FAVORITE Button, Video Recording Button
 |
View all Samsung SHR-5162 manuals
Add to My Manuals
Save this manual to your list of manuals |
Page 65 highlights
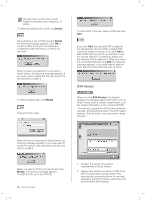
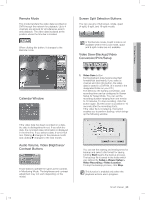
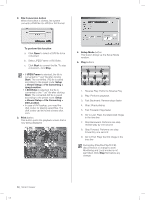
NEXT Button When this button is clicked, next screen follows. In Single Mode, the channel numbers are sequentially switched from 1 to 16. In Quad (4-split) Mode, the screens are changed like 1st 4 channels (1,2,3,4) --> 2nd 4 channels (5,6,7,8) --> 3rd 4 channels (9,10,11,12) --> 4th 4 channels (13,14,15,16). In 9-split Mode, the screens are changed from 9 channels (1,2,3,4,5,6,7,8,9) to 7 channels (10,11,12,13,14,15,16). In 16-split Mode, the screen is refreshed. CALLBACK Button If you press this button, the callback window is activated to receive event messages. When receiving a message, Smart Viewer automatically connects to the corresponding DVR. The messages are video loss events, alarm events, and motion detection events. You can decide whether the received event will bring up alarming sound or not. SHR-5162_Eng.indb 61 FAVORITE Button If you press this button, the favorite window is activated. 1 2 3 4 1. The cameras set for Favorite are displayed on the screen. 2. Clicking Delete removes a favorite setting. Clicking Delete All removes all the favorite settings. 3. Click this button to save the new favorite number and name. 4. Change favorites at the preset interval. The FAVORITE button is available only when you connect to a site. The FAVORITE settings are saved in the Config file even after you disconnect the site. When you change the DVR list that makes the site in Setup, the FAVORITE settings are initialized. Video Recording Button If you select a channel and click REC, the video data will be saved in a DVR file on your PC. The directory, file naming convention, and recording time can be configured in Viewer Setup for Setup Mode. The saved video file can be played in Search mode. To stop recording, click this button again. But this action is possible in 10 seconds after the recording starts. Smart Viewer _61 2007-06-18 11:50:09 10 Smart Viewer
-
 1
1 -
2
-
3
-
4
-
5
-
6
-
7
-
8
-
9
-
10
-
11
-
12
-
13
-
14
-
15
-
16
-
17
-
18
-
19
-
20
-
21
-
22
-
23
-
24
-
25
-
26
-
27
-
28
-
29
-
30
-
31
-
32
-
33
-
34
-
35
-
36
-
37
-
38
-
39
-
40
-
41
-
42
-
43
-
44
-
45
-
46
-
47
-
48
-
49
-
50
-
51
-
52
-
53
-
54
-
55
-
56
-
57
-
58
-
59
-
 60
60 -
 61
61 -
 62
62 -
 63
63 -
 64
64 -
 65
65 -
 66
66 -
 67
67 -
 68
68 -
 69
69 -
 70
70 -
71
-
72
-
73
-
74
-
75
-
76
-
77
-
78
-
79
-
80
-
81
-
82
-
83
-
84
-
85
-
86
-
87
-
88
-
89
-
90
-
91
-
92
-
93
 |
 |