Samsung SHR-5162 User Manual - Page 25
All Key Lock - admin password
 |
View all Samsung SHR-5162 manuals
Add to My Manuals
Save this manual to your list of manuals |
Page 25 highlights
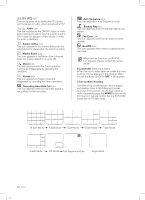
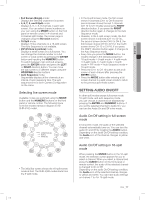
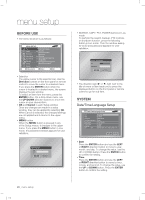
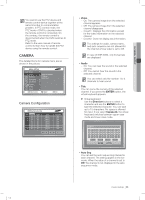
[Date/Time Change] CAUTION After the date and time has been changed, the data recorded before the change can be removed. For example, if the current time is changed from 8 to 7, all the data recorded between 7 and 8 will be deleted. Time Zone Set the local time zone based on the Greenwich Mean Time (GMT). Time Synchronization The time of your DVR can be synchronized by a specified server. For this purpose, enter the IP address of the time server and determine the initiator of this activity. - Automatic Time Synchronization Synchronizes while gathering time information from the Time Server (IP) - Activate by Server(Master) Time Synchronization is executed while more than two DVR devices are connected, and the operating DVR device connected to the server is set as standard. Time Synchronization Setup Automatic Time Synchronization On Time Server(IP) 203.248.240.103 Activate by Server(Master) On Last Synchronization Time 2007-01-26 12:39:12 Fail OK Cancel Date Format The system supports 3 types of formats: YYYY-MM-DD, DD-MM-YYYY, and MM-DDYYYY. Time Format The system supports 2 type of formats: 24 Hours and 12 Hours(AM/PM). Language After selecting a language, on-screen display (OSD) menus are displayed in the selected language. DST (Daylight Saving Time) DST sets the clock one hour ahead the local standard time. This setting enables the system to display the time adjusted for DST. If the DST is set to Off, it does not apply. To set the DST, enter the start time and end time on the right. It allows you to set month, week (e.g. 1st, 2nd, 3rd, 4th, last), date, and time only. Password The factory default password for Admin and user privileges is "4321." The Menu Setup window cannot be accessed by user privileges but by the Admin privilege. The Admin user can give users (User1 to User5) access rights to the selected functions. If you press Setup in User Authority, all the access rights are selected. SHR-5162_Eng.indb 21 05 MENU SETUP Password Admin Password New Password Confirm Password Lock On Record Lock On User Password User Setup User1 New Password Confirm User Authority Setup Search Backup PTZ Shutdown All Key Lock On OK Cancel New Password You can change the password by entering a new password value in this field. The input password is allowed up to 8 digits. Press the ENTER button and enter numbers using the NUMERIC buttons on the front panel or remote control. Press the ENTER button again for confirmation. Then the cursor moves to the New Password Confirm field. Confirm It confirms that the newly input password is correct. Enter the new password again in the field. Password Lock If it is set to On, a pop-up window for asking the password appears every time you select a menu. If it is set to Off, you can enter menus without entering the password. Record Lock If the Record Lock is set to On, a pop-up window, asking for the password appears while disabling the recording. User Authority You can select any of Search, Backup, PTZ, and Shutdown. If the user has no access right for Search, the user cannot enter the Search menu. All Key Lock On If you select this, the system will enter the live mode immediately. If you press any button on the front panel or remote control, the password input window appears. If the correct password is input, the lock function is deactivated. [All Key Lock On] If you select this, the system immediately switches to the live mode and all buttons are locked. If the user enters the selected function, he or she has to input the password first. menu setup _21 2007-06-18 11:48:09
-
 1
1 -
2
-
3
-
4
-
5
-
6
-
7
-
8
-
9
-
10
-
11
-
12
-
13
-
14
-
15
-
16
-
17
-
18
-
19
-
 20
20 -
 21
21 -
 22
22 -
 23
23 -
 24
24 -
 25
25 -
 26
26 -
 27
27 -
 28
28 -
 29
29 -
 30
30 -
31
-
32
-
33
-
34
-
35
-
36
-
37
-
38
-
39
-
40
-
41
-
42
-
43
-
44
-
45
-
46
-
47
-
48
-
49
-
50
-
51
-
52
-
53
-
54
-
55
-
56
-
57
-
58
-
59
-
60
-
61
-
62
-
63
-
64
-
65
-
66
-
67
-
68
-
69
-
70
-
71
-
72
-
73
-
74
-
75
-
76
-
77
-
78
-
79
-
80
-
81
-
82
-
83
-
84
-
85
-
86
-
87
-
88
-
89
-
90
-
91
-
92
-
93
 |
 |