Samsung SHR-5162 User Manual - Page 8
Fast/Step Rewind, PLAY/PAUSE, Fast/Step Forward, Direction, Channel, Eject, Power - 16 channel
 |
View all Samsung SHR-5162 manuals
Add to My Manuals
Save this manual to your list of manuals |
Page 8 highlights
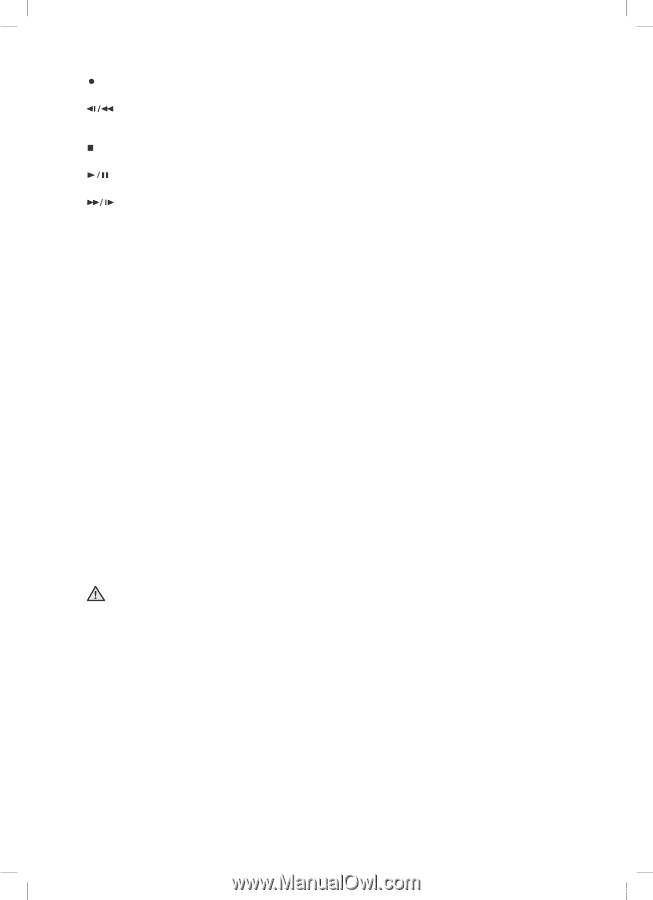
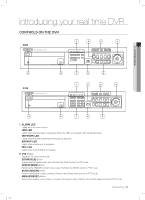
3. REC Button Starts or ends the recording (Fast/Step Rewind) Button - Step Rewind: Used for backward scene-by-scene search while at pause. - Fast Rewind: Used for quick backward search while in play. (-x2, -x4, -x8, -x16, -x32, -x64) (STOP) Button Ends search while in play. (PLAY/PAUSE) Button Pauses and resumes the screen play. (Fast/Step Forward) Button - Fast Forward: Used for quick forward search while in play. (x2, x4, x8, x16, x32, x64) - Step Forward: Used for forward scene-by-scene search while at pause. 4. Direction Buttons Used for changing settings or for moving the cursor up/down/left/right. 5. MODE Button When pressed in live mode, it sequentially display 16-split, 9-split, 4-split, 6-split, 7-split, 8-split, Picture in Picture (PIP), and single sequence. When pressed in playback mode for playback-exclusive channels (16, 9, 4), it sequentially displays single channel, 1 playback channel with 1 live channel, 1 playback channel with 8 live channels, 1 playback channel with 12 live channels, and 1 playback channel with 15 live channels. AUDIO Button Toggles Audio On and Off. ALARM Button Turns off the alarm LED and stops the sound when an alarm is issued. Alarm icon disappears when the alarm button is used. BACKUP Button Press it for backup operation. 6. USB Port Use it to connect USB type devices. 7. Channel Button Select a single channel (1 to 16) while in live mode. 8. Eject Button Opens the DVD-RW tray. 9. Power LED Displays power On/Off state. Power Button Press to turn on the power or shut down your DVR in live mode. Do not install DVR on the carpet or other soft material to prevent clogging of the air ventilator. CAUTION To install DVR on the cabinet or rack, be sure to check the ventilation condition. 04_ introducing SHR-5162_Eng.indb 4 2007-06-18 11:47:03
-
 1
1 -
2
-
 3
3 -
 4
4 -
 5
5 -
 6
6 -
 7
7 -
 8
8 -
 9
9 -
 10
10 -
 11
11 -
 12
12 -
 13
13 -
14
-
15
-
16
-
17
-
18
-
19
-
20
-
21
-
22
-
23
-
24
-
25
-
26
-
27
-
28
-
29
-
30
-
31
-
32
-
33
-
34
-
35
-
36
-
37
-
38
-
39
-
40
-
41
-
42
-
43
-
44
-
45
-
46
-
47
-
48
-
49
-
50
-
51
-
52
-
53
-
54
-
55
-
56
-
57
-
58
-
59
-
60
-
61
-
62
-
63
-
64
-
65
-
66
-
67
-
68
-
69
-
70
-
71
-
72
-
73
-
74
-
75
-
76
-
77
-
78
-
79
-
80
-
81
-
82
-
83
-
84
-
85
-
86
-
87
-
88
-
89
-
90
-
91
-
92
-
93
 |
 |