Samsung SHR-5162 User Manual - Page 35
Event, Driven, AO >, Alarm Out, Alarm1, to 23, S to H, Event Driven, Holiday, ENTER, Bandwidth, - 500
 |
View all Samsung SHR-5162 manuals
Add to My Manuals
Save this manual to your list of manuals |
Page 35 highlights
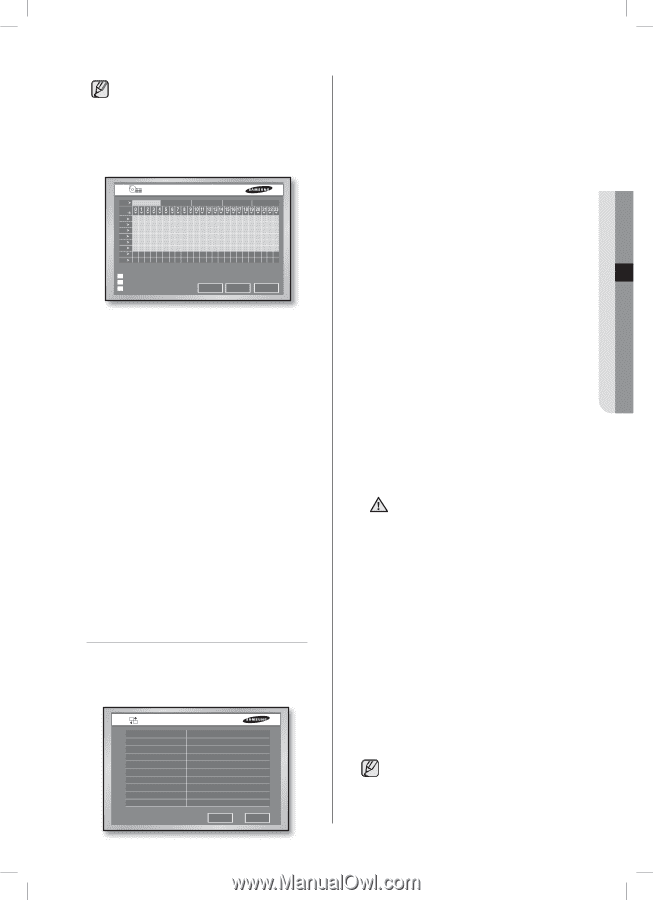
In case of SHR-5082, only 8 channels are displayed. Alarm Out Schedule You can schedule the automatic output for alarms. Alarm Out Schedule Ao Alarm 1 All S M T W T F S H Alarm 2 Alarm 3 Alarm 4 Off On Event Driven Holiday OK Beep Cancel The scheduling is enabled by selecting alarms, days and time blocks. The default setting is Event Driven. For each alarm or beep, you can activate or deactivate alarming. In case of Event Driven, the alarm can be sent only when an event is issued. AO >: It indicates Alarm Out. All alarms are changed according to Alarm1 when it pressed. 0 to 23: Time values for horizontal row. S to H: Days (Sunday to Saturday) and Holiday (H). ALL: Press this and it changes the overall settings in the current window to Off, On, and Event Driven. Off: Sets not to issue an alarm during the setting time. On: Sets to issue an alarm during the setting time. Event Driven: Sets to issue an alarm when an event occurs during the setting time. Holiday If you press Holiday, a calendar window appears for you to designate holidays. Place the cursor to a date and press the ENTER button to complete designation. (When pressing the ENTER button again, the setting is cancelled.) NETWORK You can configure the network related settings for network connection. IP Settings IP Settings Connection Mode Bandwidth Admin Password User Password IP Gateway Subnet Mask DNS ADSL User ID Password Static IP 2 Mbps 192.168.001.201 192.168.001.001 255.255.255.000 168.126.036.001 ID OK Cancel SHR-5162_Eng.indb 31 05 MENU SETUP Connection Mode Select a network type that is connected to the main body of the product. - Static IP: When the main body is connected to the network using the static IPs. - Dynamic IP: When the main body is connected to the network using the dynamic IPs supplied by DHCP. - ADSL(PPPoE): When the main body is connected to the ADSL network using Pointto-Point Protocol over Ethernet (PPPoE). Bandwidth Select a network speed among Unlimited, 2 Mbps, 1.5 Mbps, 1 Mbps, 800 Kbps, 600 Kbps, 500 Kbps, 400 Kbps, 300 Kbps, and 128 Kbps. If the connection is made via ADSL, you can only select the bandwidth of 600 kbps or less. Admin Password It is used for connection between Smart Viewer and this product using the Admin privilege. The password can be input up to 8 digits. Press the ENTER button and type the numbers you want using the NUMERIC buttons. The default Admin password is "4321." User Password It is used for connection between Smart Viewer and this product using the user privilege. The password can be input up to 8 digits. Press the ENTER button and type the numbers you want using the NUMERIC buttons. The default user password is "4321." With the user privilege, you cannot access to both Menu Setup window in DVR and DVR Setup screen in Smart Viewer. 1. CAUTION 2. 3. If the main body of the product is connected to a high-speed network like LAN, it is recommended to set the higher bandwidth than 1 Mbps. If the device is connected to a network using ADSL or low bandwidth, set the bandwidth not to exceed 600Kbps, and set the recording mode not to exceed CIF (standard). Setting up to a higher bandwidth or higher recording mode for the network environment supporting a low bandwidth may cause a network overload, therefore the connection to Smart Viewer or image monitoring may not operate properly. When the connection mode is set to ADSL, the bandwidth is fixed to 300Kbps. In case of ADSL, the protocol type is fixed to TCP. menu setup _31 2007-06-18 11:48:31
-
 1
1 -
2
-
3
-
4
-
5
-
6
-
7
-
8
-
9
-
10
-
11
-
12
-
13
-
14
-
15
-
16
-
17
-
18
-
19
-
20
-
21
-
22
-
23
-
24
-
25
-
26
-
27
-
28
-
29
-
 30
30 -
 31
31 -
 32
32 -
 33
33 -
 34
34 -
 35
35 -
 36
36 -
 37
37 -
 38
38 -
 39
39 -
 40
40 -
41
-
42
-
43
-
44
-
45
-
46
-
47
-
48
-
49
-
50
-
51
-
52
-
53
-
54
-
55
-
56
-
57
-
58
-
59
-
60
-
61
-
62
-
63
-
64
-
65
-
66
-
67
-
68
-
69
-
70
-
71
-
72
-
73
-
74
-
75
-
76
-
77
-
78
-
79
-
80
-
81
-
82
-
83
-
84
-
85
-
86
-
87
-
88
-
89
-
90
-
91
-
92
-
93
 |
 |