Samsung SHR-5162 User Manual - Page 50
Smart Viewer INITIAL SCREEN, SETUP MODE
 |
View all Samsung SHR-5162 manuals
Add to My Manuals
Save this manual to your list of manuals |
Page 50 highlights
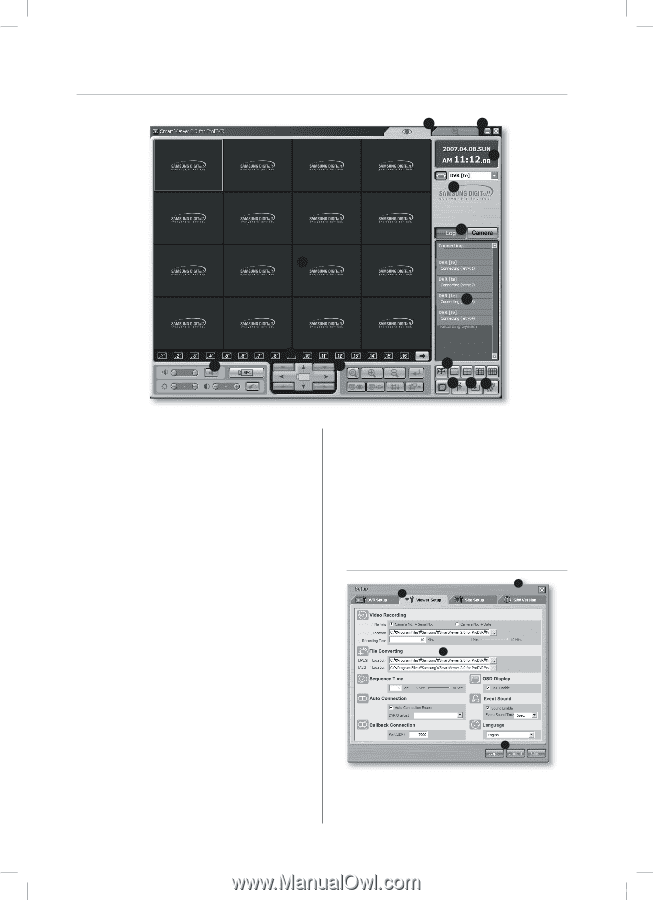
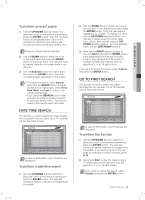
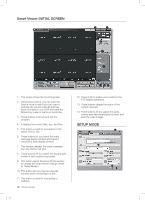
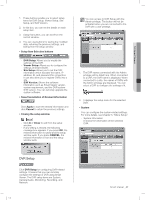
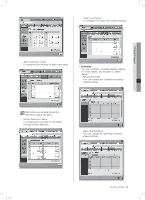
Smart Viewer INITIAL SCREEN 1 2 3 4 5 6 7 13 14 12 8 11 10 9 1. This screen shows the monitoring sites. 2. Using these buttons, you can enter the Search mode in which you can search and play the remote video file that has been recorded on your DVR and enter the Monitoring mode for real-time monitoring. 3. These buttons minimize and exit the program. 4. It displays the current date, day, and time. 5. This button is used for connection to the preset DVR or site. 6. These buttons let you select the event message display window and camera connection state display window. 7. This window displays the event messages from the DVR in real time. 8. These buttons let you select the wanted split screen or auto sequencing screen. 9. This button opens the Setup Mode window to change the Smart Viewer settings. (Refer to "Setup Mode.") 10. This button lets you choose a favorite function when connecting to a site. 11. This button is used for connecting to Callback. 46_ Smart Viewer SHR-5162_Eng.indb 46 12. These buttons enable you to perform the PTZ-related operations. 13. These buttons display the status of the current channels. 14. These buttons let you adjust the audio volume and video brightness/contrast, and save the video images. SETUP MODE 3 1 2 4 2007-06-18 11:49:30
-
 1
1 -
2
-
3
-
4
-
5
-
6
-
7
-
8
-
9
-
10
-
11
-
12
-
13
-
14
-
15
-
16
-
17
-
18
-
19
-
20
-
21
-
22
-
23
-
24
-
25
-
26
-
27
-
28
-
29
-
30
-
31
-
32
-
33
-
34
-
35
-
36
-
37
-
38
-
39
-
40
-
41
-
42
-
43
-
44
-
 45
45 -
 46
46 -
 47
47 -
 48
48 -
 49
49 -
 50
50 -
 51
51 -
 52
52 -
 53
53 -
 54
54 -
 55
55 -
56
-
57
-
58
-
59
-
60
-
61
-
62
-
63
-
64
-
65
-
66
-
67
-
68
-
69
-
70
-
71
-
72
-
73
-
74
-
75
-
76
-
77
-
78
-
79
-
80
-
81
-
82
-
83
-
84
-
85
-
86
-
87
-
88
-
89
-
90
-
91
-
92
-
93
 |
 |