Sharp AR-BC260 ARBC260 Operation Manual - Page 103
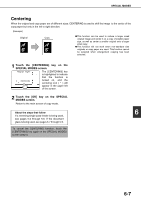
Centering, Touch the [CENTERING] key on the, SPECIAL MODES screen., Touch the [OK] key on the SPECIAL
 |
View all Sharp AR-BC260 manuals
Add to My Manuals
Save this manual to your list of manuals |
Page 103 highlights
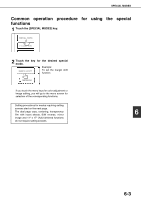
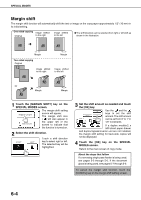
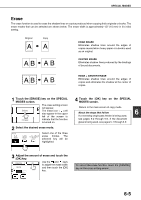
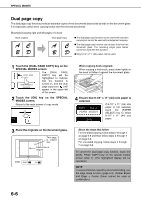
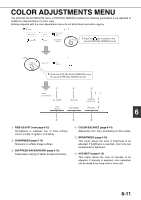
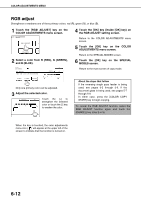
SPECIAL MODES Centering When the original and copy paper are of different sizes, CENTERING is used to shift the image to the center of the copy paper but only in the left to right direction. [Example] Original Copy G This function can be used to reduce a larger sized original image and center it on a copy of smaller paper size, as well as center a smaller original onto a larger sized copy. G This function will not work when non-standard size originals or copy paper are used. This function cannot be selected when enlargement copying has been selected. 1 Touch the [CENTERING] key on the SPECIAL MODES screen. MARGIN SHIFT The [CENTERING] key is highlighted to indicate that the function is CENTERING turned on, and the centering icon ( ) will appear in the upper left of the screen. 2 Touch the [OK] key on the SPECIAL MODES screen. Return to the main screen of copy mode. About the steps that follow 6 If a reversing single pass feeder is being used, see pages 5-2 through 5-6. If the document glass is being used, see pages 5-7 through 5-9. To cancel the CENTERING function, touch the [CENTERING] key again on the SPECIAL MODES screen (step1). 6-7
-
 1
1 -
2
-
3
-
4
-
5
-
6
-
7
-
8
-
9
-
10
-
11
-
12
-
13
-
14
-
15
-
16
-
17
-
18
-
19
-
20
-
21
-
22
-
23
-
24
-
25
-
26
-
27
-
28
-
29
-
30
-
31
-
32
-
33
-
34
-
35
-
36
-
37
-
38
-
39
-
40
-
41
-
42
-
43
-
44
-
45
-
46
-
47
-
48
-
49
-
50
-
51
-
52
-
53
-
54
-
55
-
56
-
57
-
58
-
59
-
60
-
61
-
62
-
63
-
64
-
65
-
66
-
67
-
68
-
69
-
70
-
71
-
72
-
73
-
74
-
75
-
76
-
77
-
78
-
79
-
80
-
81
-
82
-
83
-
84
-
85
-
86
-
87
-
88
-
89
-
90
-
91
-
92
-
93
-
94
-
95
-
96
-
97
-
 98
98 -
 99
99 -
 100
100 -
 101
101 -
 102
102 -
 103
103 -
 104
104 -
 105
105 -
 106
106 -
 107
107 -
 108
108 -
109
-
110
-
111
-
112
-
113
-
114
-
115
-
116
-
117
-
118
-
119
-
120
-
121
-
122
-
123
-
124
-
125
-
126
-
127
-
128
-
129
-
130
-
131
-
132
-
133
-
134
-
135
-
136
-
137
-
138
-
139
-
140
 |
 |
