Sharp AR-BC260 ARBC260 Operation Manual - Page 116
the MULTI SHOT setting screen., Touch the [OK] key inside [OK] key
 |
View all Sharp AR-BC260 manuals
Add to My Manuals
Save this manual to your list of manuals |
Page 116 highlights
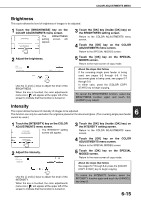
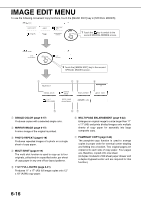
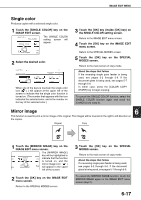
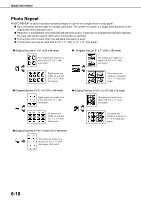
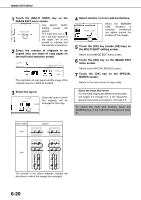
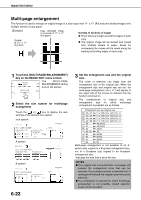
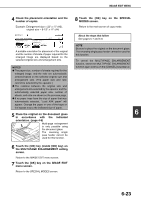
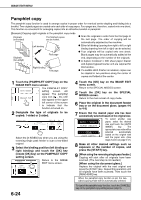
IMAGE EDIT MENU 1 Touch the [MULTI SHOT] key on the IMAGE EDIT menu screen. OK AT MULTI SHOT OPY The MULTI SHOT setting screen will appear. The multi shot icon ( , etc.) will also appear in the upper left of the screen to indicate that the function is turned on. 2 Select the number of originals to be copied onto one sheet of copy paper on the multi shot selection screen. IMAGE EDIT MULTI SHOT 2in1 4in1 OK CANCEL OK LAYOUT BORDER LINE The orientation of copy paper and the image of the originals may be rotated as needed. 3 Select the layout. CANCEL LAYOUT O Select the order in which the originals will be BORDER arranged on the copy. 4 Select whether or not to add borderlines. CANCEL OK YOUT BORDER LINE When the BORDER LINE checkbox is selected, borderlines are added around the borders of the images. 5 Touch the [OK] key (inside [OK] key) on the MULTI SHOT setting screen. Return to the IMAGE EDIT menu screen. 6 Touch the [OK] key on the IMAGE EDIT menu screen. Return to the SPECIAL MODES screen. 7 Touch the [OK] key on the SPECIAL MODES screen. Return to the main screen of copy mode. About the steps that follow If a reversing single pass feeder is being used, see pages 5-2 through 5-6. If the document glass is being used, see pages 5-7 through 5-9. To cancel the multi shot function, touch the [CANCEL] key on the multi shot setting screen (step 2). Shot number 2in1 Layout 4in1 The arrows in the above diagram indicate the directions in which the images are arranged. 6-20
-
 1
1 -
2
-
3
-
4
-
5
-
6
-
7
-
8
-
9
-
10
-
11
-
12
-
13
-
14
-
15
-
16
-
17
-
18
-
19
-
20
-
21
-
22
-
23
-
24
-
25
-
26
-
27
-
28
-
29
-
30
-
31
-
32
-
33
-
34
-
35
-
36
-
37
-
38
-
39
-
40
-
41
-
42
-
43
-
44
-
45
-
46
-
47
-
48
-
49
-
50
-
51
-
52
-
53
-
54
-
55
-
56
-
57
-
58
-
59
-
60
-
61
-
62
-
63
-
64
-
65
-
66
-
67
-
68
-
69
-
70
-
71
-
72
-
73
-
74
-
75
-
76
-
77
-
78
-
79
-
80
-
81
-
82
-
83
-
84
-
85
-
86
-
87
-
88
-
89
-
90
-
91
-
92
-
93
-
94
-
95
-
96
-
97
-
98
-
99
-
100
-
101
-
102
-
103
-
104
-
105
-
106
-
107
-
108
-
109
-
110
-
 111
111 -
 112
112 -
 113
113 -
 114
114 -
 115
115 -
 116
116 -
 117
117 -
 118
118 -
 119
119 -
 120
120 -
 121
121 -
122
-
123
-
124
-
125
-
126
-
127
-
128
-
129
-
130
-
131
-
132
-
133
-
134
-
135
-
136
-
137
-
138
-
139
-
140
 |
 |
