Sharp AR-BC260 ARBC260 Operation Manual - Page 90
REDUCTION/ENLARGEMENT/ZOOM, Automatic selection (auto image
 |
View all Sharp AR-BC260 manuals
Add to My Manuals
Save this manual to your list of manuals |
Page 90 highlights
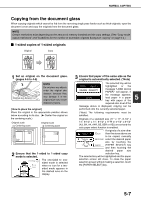
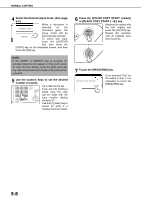
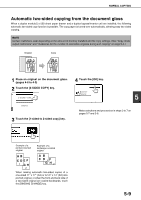
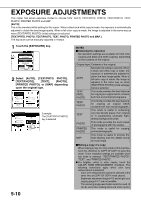
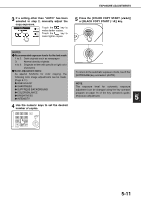
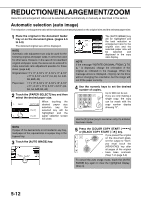
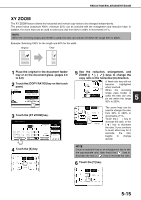
REDUCTION/ENLARGEMENT/ZOOM Reduction and enlargement ratios can be selected either automatically or manually as described in this section. Automatic selection (auto image) The reduction or enlargement ratio will be selected automatically based on the original size and the selected paper size. 1 Place the original in the document feeder tray or on the document glass. (pages 4-6 to 4-9) The detected original size will be displayed. NOTE Automatic ratio adjustment can only be used for the following original and paper sizes. It cannot be used for other sizes. However, in the case of non-standard original and paper sizes, the sizes can be entered to make automatic ratio adjustment possible for those sizes. (page 4-8) Original sizes:11" x 17", 8-1/2" x 14", 8-1/2" x 11", 8-1/2" x 11"R, 5-1/2" x 8-1/2" (A3, B4, A4, A4R, B5, B5R, A5) Paper size: 11" x 17", 8-1/2" x 14", 8-1/2" x 13", 8-1/2" x 11", 8-1/2" x 11"R, 5-1/2" x 8-1/2" (A3, B4, A4, A4R, B5, A5) 2 Touch the [PAPER SELECT] key and then select the desired paper size. 1. 8½x11 2. 11x17 3. 8½x14 RECYCLED PLAIN PLAIN When touching the desired paper size selection key, the selected key will be highlighted and the paper selection screen will close. NOTE If paper of the desired size is not loaded in any tray, load paper of the required size in a paper tray or the bypass tray. 3 Touch the [AUTO IMAGE] key. PAPER EX AUTO IMAGE 1 COPY ORIGINAL 8½x11 PLAIN 8½x11 8½x11 DUPLEX 11x17 8½x14 AUTO IMAGE 0 AUTO ORIGINAL AUTO EXPOSURE 11x17 PAPER SELECT 129% COPY RATIO The [AUTO IMAGE] key will be highlighted and the best reduction or enlargement ratio for the original size and the selected paper size will be selected and displayed in the copy ratio display. NOTE If the message "ROTATE ORIGINAL FROM TO " is displayed, change the orientation of the original as indicated in the message. When the message above is displayed, copying can be done without changing the orientation, but the image will not fit the paper correctly. 4 Use the numeric keys to set the desired number of copies. Up to 999 can be set. If you are only making a single copy, the copy can be made with the copy number display showing "0". Use the [C] (clear) key to cancel an entry if a mistake has been made. 5 Press the [COLOR COPY START ( or [BLACK COPY START ( )] key. )] If you placed the original on the document glass, set the output to "Sort", you must touch the [READ-END] key after all pages of the original have been scanned. (Step 7 on page 5-8) To cancel the auto image mode, touch the [AUTO IMAGE] key again to clear the highlighted display. (Step 3) 5-12
-
 1
1 -
2
-
3
-
4
-
5
-
6
-
7
-
8
-
9
-
10
-
11
-
12
-
13
-
14
-
15
-
16
-
17
-
18
-
19
-
20
-
21
-
22
-
23
-
24
-
25
-
26
-
27
-
28
-
29
-
30
-
31
-
32
-
33
-
34
-
35
-
36
-
37
-
38
-
39
-
40
-
41
-
42
-
43
-
44
-
45
-
46
-
47
-
48
-
49
-
50
-
51
-
52
-
53
-
54
-
55
-
56
-
57
-
58
-
59
-
60
-
61
-
62
-
63
-
64
-
65
-
66
-
67
-
68
-
69
-
70
-
71
-
72
-
73
-
74
-
75
-
76
-
77
-
78
-
79
-
80
-
81
-
82
-
83
-
84
-
 85
85 -
 86
86 -
 87
87 -
 88
88 -
 89
89 -
 90
90 -
 91
91 -
 92
92 -
 93
93 -
 94
94 -
 95
95 -
96
-
97
-
98
-
99
-
100
-
101
-
102
-
103
-
104
-
105
-
106
-
107
-
108
-
109
-
110
-
111
-
112
-
113
-
114
-
115
-
116
-
117
-
118
-
119
-
120
-
121
-
122
-
123
-
124
-
125
-
126
-
127
-
128
-
129
-
130
-
131
-
132
-
133
-
134
-
135
-
136
-
137
-
138
-
139
-
140
 |
 |
