Sharp AR-BC260 ARBC260 Operation Manual - Page 34
Setting the paper type and paper size in the bypass tray, Touch [SPEED MODE] or [QUALITY MODE]
 |
View all Sharp AR-BC260 manuals
Add to My Manuals
Save this manual to your list of manuals |
Page 34 highlights
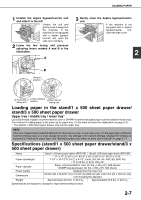
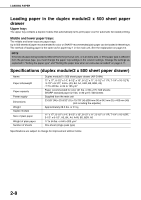
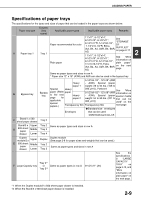
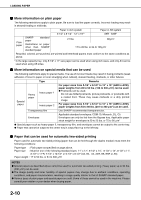
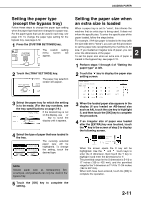
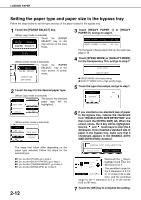
LOADING PAPER Setting the paper type and paper size in the bypass tray Follow the steps below to set the type and size of the paper loaded in the bypass tray. 1 Touch the [PAPER SELECT] key. (When copy mode is selected) Touch the [PAPER AUTO 8½x11 PAPER SELECT SELECT] key in the main screen of the copy mode. 100% (When printer mode is selected) Touch the [PAPER 8½x11 PAPER SELECT SELECT] key in the main screen of printer mode. CONDITION SETTINGS 2 Touch the key for the desired paper type. (When copy mode is selected) UTO EXPOSURE The key for the selected PLAIN paper type will be HEAVY PAPER PAPER SELECT highlighted. TRANSPARENCY ENVELOPE 100% COPY RATIO (When printer mode is selected) PLAIN HEAVY PAPER TRANSPARENCY ENVELOPE PAPER SELECT CONDITION SETTINGS 3 Touch [HEAVY PAPER 1] or [HEAVY PAPER 2], and go to step 6. HEAVY PAPER1 28+lbs. 54 lbs. HEAVY PAPER2 54+lbs. 80 lbs. For the types of heavy paper that can be used, see page 2-10. 4 Touch [SPEED MODE] or [QUALITY MODE] for the transparency film, and go to step 7. SPEED MODE QUALITY MODE G SPEED MODE is for fast printing. G QUALITY MODE is for a high quality image. 5 Touch the type of envelope, and go to step 7. COM-10 OK MONARCH C5 DL 6 If you inserted a non-standard size of paper in the bypass tray, remove the checkmark from "ENABLE AUTO SIZE DETECTION" and then touch the [EXTRA SIZE] tab. When the screen opens, the X key will be highlighted. Use the and touch keys to enter the X dimension. If you inserted a standard size of paper in the bypass tray, make sure that a checkmark appears in the [ENABLE AUTO SIZE DETECTION] checkbox. The steps that follow differ depending on the paper type selected. Follow the steps for the selected type. G If you touched [PLAIN], go to step 6. G If you touched [HEAVY PAPER], go to step 3 G If you touched [TRANSPARENCY], go to step 4. G If you touched [ENVELOPE], go to step 5. 2-12 ENABLE AUTO SIZE DETECTION EXTRA SIZE BASIC SETTING OK X 5 ½ (5 1/2 17) inch Y 4 (4 11 3/4) inch Next touch the key to highlight it and enter the dimensions for Y. The permitted range for the X dimension is 5-1/2 EXTRA SIZE BASIC SETTING to 17 inches (139 to 432 mm), and the permitted range for the Y dimension is 4 to 11-3/4 inches (100 to 297 mm). 7 Touch the [OK] key to complete the setting.
-
 1
1 -
2
-
3
-
4
-
5
-
6
-
7
-
8
-
9
-
10
-
11
-
12
-
13
-
14
-
15
-
16
-
17
-
18
-
19
-
20
-
21
-
22
-
23
-
24
-
25
-
26
-
27
-
28
-
 29
29 -
 30
30 -
 31
31 -
 32
32 -
 33
33 -
 34
34 -
 35
35 -
 36
36 -
 37
37 -
 38
38 -
 39
39 -
40
-
41
-
42
-
43
-
44
-
45
-
46
-
47
-
48
-
49
-
50
-
51
-
52
-
53
-
54
-
55
-
56
-
57
-
58
-
59
-
60
-
61
-
62
-
63
-
64
-
65
-
66
-
67
-
68
-
69
-
70
-
71
-
72
-
73
-
74
-
75
-
76
-
77
-
78
-
79
-
80
-
81
-
82
-
83
-
84
-
85
-
86
-
87
-
88
-
89
-
90
-
91
-
92
-
93
-
94
-
95
-
96
-
97
-
98
-
99
-
100
-
101
-
102
-
103
-
104
-
105
-
106
-
107
-
108
-
109
-
110
-
111
-
112
-
113
-
114
-
115
-
116
-
117
-
118
-
119
-
120
-
121
-
122
-
123
-
124
-
125
-
126
-
127
-
128
-
129
-
130
-
131
-
132
-
133
-
134
-
135
-
136
-
137
-
138
-
139
-
140
 |
 |
