Sharp AR-BC260 ARBC260 Operation Manual - Page 119
the MULTI- ENLARGEMENT setting
 |
View all Sharp AR-BC260 manuals
Add to My Manuals
Save this manual to your list of manuals |
Page 119 highlights
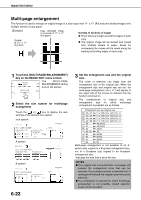
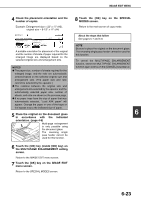
IMAGE EDIT MENU 4 Check the placement orientation and the number of copies Example: Enlargement size = 22" x 17" (A2), original size = 8-1/2" x 11" (A4) IMAGE EDIT MULTI-PAGE ENLARGEMENT ENLARGEMENT SIZE (INCH) 22x17 22x34 ORIGINAL SIZE & ORIENTATION 11x17 8½x14 34x44 44x68 8½x11 CANCEL OK OK 3/3 A suitable orientation for placement of the original and the number of sheets of paper required for the enlarged image are displayed based on the selected original size and enlargement size. NOTES G The paper size, number of sheets required for the enlarged image, and the ratio are automatically selected based on the selected original size and enlargement size. (The paper size and ratio cannot be selected by the operator.) G The relations between the original size and enlargement size selected by the operator and the automatically selected paper size, number of sheets, and ratio are shown on the previous page. G If no paper trays have the size of paper that was automatically selected, "Load XXX paper" will appear. Change the paper in one of the trays or the bypass tray to the indicated size of paper. 5 Place the original on the document glass in accordance with the indicated orientation. (page 4-6) Multi-page enlargement is only possible using the document glass. The reversing single pass feeder cannot be used for this function. 6 Touch the [OK] key (inside [OK] key) on the MULTI-PAGE ENLARGEMENT setting screen. Return to the IMAGE EDIT menu screen. 7 Touch the [OK] key on the IMAGE EDIT menu screen. Return to the SPECIAL MODES screen. 8 Touch the [OK] key on the SPECIAL MODES screen. Return to the main screen of copy mode. About the steps that follow See pages 5-7 and 5-8. NOTE Be sure to place the original on the document glass. The reversing single pass feeder cannot be used for this function. To cancel the MULTI-PAGE ENLARGEMENT function, select the MULTI-PAGE ENLARGEMENT function again and touch the [CANCEL] key (step 4). 6 6-23
-
 1
1 -
2
-
3
-
4
-
5
-
6
-
7
-
8
-
9
-
10
-
11
-
12
-
13
-
14
-
15
-
16
-
17
-
18
-
19
-
20
-
21
-
22
-
23
-
24
-
25
-
26
-
27
-
28
-
29
-
30
-
31
-
32
-
33
-
34
-
35
-
36
-
37
-
38
-
39
-
40
-
41
-
42
-
43
-
44
-
45
-
46
-
47
-
48
-
49
-
50
-
51
-
52
-
53
-
54
-
55
-
56
-
57
-
58
-
59
-
60
-
61
-
62
-
63
-
64
-
65
-
66
-
67
-
68
-
69
-
70
-
71
-
72
-
73
-
74
-
75
-
76
-
77
-
78
-
79
-
80
-
81
-
82
-
83
-
84
-
85
-
86
-
87
-
88
-
89
-
90
-
91
-
92
-
93
-
94
-
95
-
96
-
97
-
98
-
99
-
100
-
101
-
102
-
103
-
104
-
105
-
106
-
107
-
108
-
109
-
110
-
111
-
112
-
113
-
 114
114 -
 115
115 -
 116
116 -
 117
117 -
 118
118 -
 119
119 -
 120
120 -
 121
121 -
 122
122 -
 123
123 -
 124
124 -
125
-
126
-
127
-
128
-
129
-
130
-
131
-
132
-
133
-
134
-
135
-
136
-
137
-
138
-
139
-
140
 |
 |
