Canon PIXMA MP800R Setup Guide - Page 12
Setting Up - power cord
 |
View all Canon PIXMA MP800R manuals
Add to My Manuals
Save this manual to your list of manuals |
Page 12 highlights
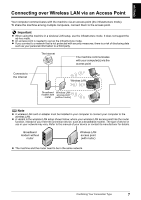
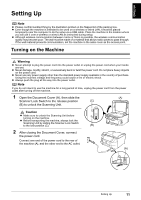
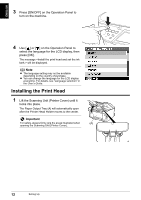
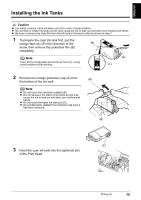
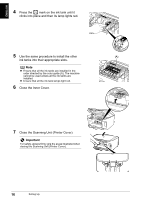
ENGLISH Setting Up Note z Please confirm bundled thing by the illustration printed on the flapped lid of the packing box. z Even though the machine is intended to be used on a wireless or wired LAN, it must be placed temporarily near the computer to do the setup via a USB cable. Place the machine in the location where you will use it over a wireless or wired LAN as instructed during setup. z Although wireless communication between rooms or floors is possible, the wireless communication quality may become poor. The wall must be made of a material that allows radio waves to pass through. If the wall material prevents communication, set the machine in the same room as the access point. Turning on the Machine Warning z Never attempt to plug the power cord into the power outlet or unplug the power cord when your hands are wet. z Never damage, modify, stretch, or excessively bend or twist the power cord. Do not place heavy objects on the power cord. z Never use any power supply other than the standard power supply available in the country of purchase. Using the incorrect voltage and frequency could cause a fire or electric shock. z Always push the plug all the way into the power outlet. Note If you do not intend to use the machine for a long period of time, unplug the power cord from the power outlet after turning off the machine. 1 Open the Document Cover (A), then slide the (A) Scanner Lock Switch to the release position (C) (B) to unlock the Scanning Unit. Caution z Make sure to unlock the Scanning Unit before turning on the machine. z Before transporting the machine, always lock the Scanning Unit by sliding the Scanner Lock Switch to the lock position (C). (B) 2 After closing the Document Cover, connect the power cord. Connect one end of the power cord to the rear of the machine (A), and the other end to the AC outlet. (A) Setting Up 11
-
 1
1 -
2
-
3
-
4
-
5
-
6
-
 7
7 -
 8
8 -
 9
9 -
 10
10 -
 11
11 -
 12
12 -
 13
13 -
 14
14 -
 15
15 -
 16
16 -
 17
17 -
18
-
19
-
20
-
21
-
22
-
23
-
24
-
25
-
26
-
27
-
28
-
29
-
30
-
31
-
32
-
33
-
34
-
35
-
36
-
37
-
38
-
39
-
40
-
41
-
42
-
43
-
44
-
45
-
46
-
47
-
48
-
49
-
50
-
51
-
52
-
53
-
54
-
55
-
56
-
57
-
58
-
59
-
60
-
61
-
62
-
63
-
64
-
65
-
66
-
67
-
68
-
69
-
70
-
71
-
72
-
73
-
74
-
75
-
76
-
77
-
78
 |
 |
