Canon PIXMA MP800R Setup Guide - Page 64
Encryption Method, Do not use, Use WEP, Use WPA, Use WPA2, Configuration, Connect
 |
View all Canon PIXMA MP800R manuals
Add to My Manuals
Save this manual to your list of manuals |
Page 64 highlights
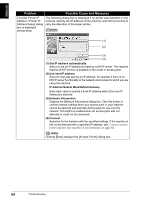
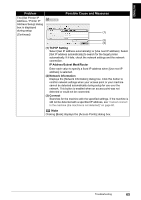
ENGLISH Problem The [Access Points] dialog box is displayed during setup (Continued) Possible Cause and Measures Encryption Method Do not use Select to disable encryption Use WEP Transmission is encrypted using the password (WEP key) you specified. Use WPA Transmission is encrypted using the passphrase (WPA key) you specified. The actual encryption key is renewed automatically at a certain time interval, making the transmission harder to break. Use WPA2 Transmission is encrypted using the passphrase (WPA2 key) you specified. The actual encryption key is renewed automatically at a certain time interval, making the transmission harder to break. Note If a password (WEP key)/passphrase (WPA or WPA2 key) has not been set, a detailed settings dialog box is displayed. To change the settings, click [Configuration] in the [Manual Setup] dialog box. For details, see "About Network Key (Windows)/Network Password (Macintosh)" on page 58. Configuration The detailed settings dialog box is displayed. The password (WEP key) or the passphrase (WPA key) selected in [Encryption Method] can be confirmed and changed. Connect Connects to the specified access point. "An access point could not be detected" is displayed during setup This message is displayed when no access point is detected. Clicking [OK] displays the [Access Points] dialog box. For details, see "The target access point is not detected" on page 57. "Printer could not be connected to the specified access point" is displayed during setup This message is displayed when the machine could not connect to the target access point. Clicking [OK] displays the [Access Points] dialog box. For details, see "The target access point is not detected" on page 57. "Another access point with the same SSID exists" is displayed during setup Cancel the current setup and change the SSID of the access point, then start the setup again. Troubleshooting 63
-
 1
1 -
2
-
3
-
4
-
5
-
6
-
7
-
8
-
9
-
10
-
11
-
12
-
13
-
14
-
15
-
16
-
17
-
18
-
19
-
20
-
21
-
22
-
23
-
24
-
25
-
26
-
27
-
28
-
29
-
30
-
31
-
32
-
33
-
34
-
35
-
36
-
37
-
38
-
39
-
40
-
41
-
42
-
43
-
44
-
45
-
46
-
47
-
48
-
49
-
50
-
51
-
52
-
53
-
54
-
55
-
56
-
57
-
58
-
 59
59 -
 60
60 -
 61
61 -
 62
62 -
 63
63 -
 64
64 -
 65
65 -
 66
66 -
 67
67 -
 68
68 -
 69
69 -
70
-
71
-
72
-
73
-
74
-
75
-
76
-
77
-
78
 |
 |
