Canon PIXMA MP800R Setup Guide - Page 62
The following screen is displayed during setup
 |
View all Canon PIXMA MP800R manuals
Add to My Manuals
Save this manual to your list of manuals |
Page 62 highlights
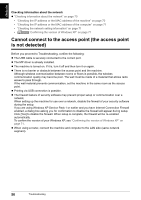
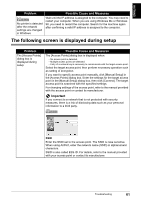
ENGLISH Problem No printer is detected after the network settings are changed in Windows Possible Cause and Measures Wait until the IP address is assigned to the computer. You may need to restart your computer. When you are using Windows Me or Windows 98, you need to restart the computer. Search for the machine again after confirming a valid IP address is assigned to the computer. The following screen is displayed during setup Problem The [Access Points] dialog box is displayed during setup Possible Cause and Measures The [Access Points] dialog box is displayed when: - No access point is detected. - Multiple access points are detected. - Entry of a network key is necessary to communicate with the target access point. Select the target access point, then perform necessary operation such as setting of encryption. If you want to specify access point manually, click [Manual Setup] in the [Access Points] dialog box. Enter the settings for the target access point in the [Manual Setup] dialog box, then click [Connect]. The target access point is searched with the specified settings. For changing settings of the access point, refer to the manual provided with the access point or contact its manufacturer. Important If you connect to a network that is not protected with security measures, there is a risk of disclosing data such as your personal information to a third party. SSID Enter the SSID set to the access point. The SSID is case sensitive. When using AirPort, enter the network name (SSID) in alphanumeric characters. SSID is also called ESS-ID. For details, refer to the manual provided with your access point or contact its manufacturer. Troubleshooting 61
-
 1
1 -
2
-
3
-
4
-
5
-
6
-
7
-
8
-
9
-
10
-
11
-
12
-
13
-
14
-
15
-
16
-
17
-
18
-
19
-
20
-
21
-
22
-
23
-
24
-
25
-
26
-
27
-
28
-
29
-
30
-
31
-
32
-
33
-
34
-
35
-
36
-
37
-
38
-
39
-
40
-
41
-
42
-
43
-
44
-
45
-
46
-
47
-
48
-
49
-
50
-
51
-
52
-
53
-
54
-
55
-
56
-
 57
57 -
 58
58 -
 59
59 -
 60
60 -
 61
61 -
 62
62 -
 63
63 -
 64
64 -
 65
65 -
 66
66 -
 67
67 -
68
-
69
-
70
-
71
-
72
-
73
-
74
-
75
-
76
-
77
-
78
 |
 |