Canon PIXMA MP800R Setup Guide - Page 14
Pull out the Paper Output Tray extension., Open the Inner Cover A., Raise the Print Head Lock Lever
 |
View all Canon PIXMA MP800R manuals
Add to My Manuals
Save this manual to your list of manuals |
Page 14 highlights
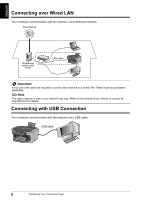
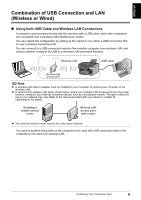
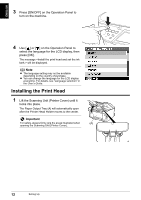
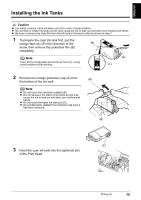
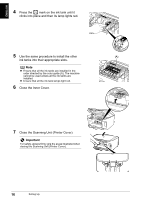
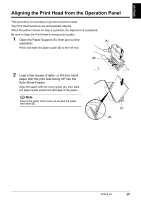
ENGLISH 2 Pull out the Paper Output Tray extension. Important Press the Open Button to open the Paper Output Tray if it does not open automatically. 3 Open the Inner Cover (A). Important For customers in the United States Write down the serial number located inside the machine (B). You will need this later to register the product. 4 Raise the Print Head Lock Lever (A) completely. Important Be careful not to touch any parts inside the machine, other than the Print Head Lock Lever. 5 Remove the Print Head from its package. (A) (B) (A) Setting Up 13
-
 1
1 -
2
-
3
-
4
-
5
-
6
-
7
-
8
-
 9
9 -
 10
10 -
 11
11 -
 12
12 -
 13
13 -
 14
14 -
 15
15 -
 16
16 -
 17
17 -
 18
18 -
 19
19 -
20
-
21
-
22
-
23
-
24
-
25
-
26
-
27
-
28
-
29
-
30
-
31
-
32
-
33
-
34
-
35
-
36
-
37
-
38
-
39
-
40
-
41
-
42
-
43
-
44
-
45
-
46
-
47
-
48
-
49
-
50
-
51
-
52
-
53
-
54
-
55
-
56
-
57
-
58
-
59
-
60
-
61
-
62
-
63
-
64
-
65
-
66
-
67
-
68
-
69
-
70
-
71
-
72
-
73
-
74
-
75
-
76
-
77
-
78
 |
 |

13
Setting Up
ENGLISH
2
Pull out the Paper Output Tray extension.
3
Open the Inner Cover (A).
4
Raise the Print Head Lock Lever (A)
completely.
5
Remove the Print Head from its package.
Important
Press the Open Button to open the Paper Output Tray
if it does not open automatically.
Important
For customers in the United States
Write down the serial number located inside the
machine (B). You will need this later to register the
product.
Important
Be careful not to touch any parts inside the machine,
other than the Print Head Lock Lever.
(A)
(B)
(A)