Canon PIXMA MP800R Setup Guide - Page 73
Printing and Initializing Network Settings
 |
View all Canon PIXMA MP800R manuals
Add to My Manuals
Save this manual to your list of manuals |
Page 73 highlights
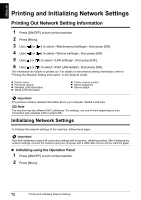
ENGLISH Printing and Initializing Network Settings Printing Out Network Setting Information 1 Press [ON/OFF] to turn on the machine. 2 Press [Menu]. 3 Use [ ] or [ ] to select , then press [OK]. 4 Use [ ] or [ ] to select , then press [OK]. 5 Use [ ] or [ ] to select , then press [OK]. 6 Use [ ] or [ ] to select , then press [OK]. The information as follows is printed out. For details on the network setting information, refer to "Printing Out Network Setting Information" in the Network Guide. z Printer name z Firmware version z Wireless LAN information z Wired LAN information z Printer access control z Admin password z Device status Important This printout contains valuable information about your computer. Handle it with care. Note The machine has two different MAC addresses. For settings, use one of them depending on your connection type (wireless LAN or wired LAN). Initializing Network Settings To initialize the network settings of the machine, follow these steps. Important Note that initialization erases all connection settings with computers, disabling printing. After initializing the network settings, connect the machine and your computer with a USB cable and set up the machine again. z Initializing using the Operation Panel 1 Press [ON/OFF] to turn on the machine. 2 Press [Menu]. 72 Printing and Initializing Network Settings
-
 1
1 -
2
-
3
-
4
-
5
-
6
-
7
-
8
-
9
-
10
-
11
-
12
-
13
-
14
-
15
-
16
-
17
-
18
-
19
-
20
-
21
-
22
-
23
-
24
-
25
-
26
-
27
-
28
-
29
-
30
-
31
-
32
-
33
-
34
-
35
-
36
-
37
-
38
-
39
-
40
-
41
-
42
-
43
-
44
-
45
-
46
-
47
-
48
-
49
-
50
-
51
-
52
-
53
-
54
-
55
-
56
-
57
-
58
-
59
-
60
-
61
-
62
-
63
-
64
-
65
-
66
-
67
-
 68
68 -
 69
69 -
 70
70 -
 71
71 -
 72
72 -
 73
73 -
 74
74 -
 75
75 -
 76
76 -
 77
77 -
 78
78
 |
 |