Canon PIXMA MP800R Setup Guide - Page 51
Click [Cancel].
 |
View all Canon PIXMA MP800R manuals
Add to My Manuals
Save this manual to your list of manuals |
Page 51 highlights
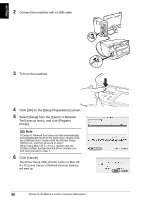
ENGLISH 2 Connect the machine with a USB cable. 3 Turn on the machine. 4 Click [OK] on the [Setup Preparations] screen. 5 Select [Setup] from the [Canon IJ Network Tool] pop-up menu, and click [Register Printer]. Note If Canon IJ Network Tool does not start automatically, select [Applications] from the [Go] menu, double-click the [Utilities] folder, double-click the [Printer Setup Utility] icon, and then proceed to step 7. When using Mac OS X v.10.2.x, double-click the [Utilities] folder, double-click the [Print Center] icon, and then proceed to step 7. 6 Click [Cancel]. The Printer Setup Utility (Printer Center on Mac OS X v.10.2) and Canon IJ Network Scanner Selector will start up. 50 Setting Up the Machine and the Computer (Macintosh)
-
 1
1 -
2
-
3
-
4
-
5
-
6
-
7
-
8
-
9
-
10
-
11
-
12
-
13
-
14
-
15
-
16
-
17
-
18
-
19
-
20
-
21
-
22
-
23
-
24
-
25
-
26
-
27
-
28
-
29
-
30
-
31
-
32
-
33
-
34
-
35
-
36
-
37
-
38
-
39
-
40
-
41
-
42
-
43
-
44
-
45
-
 46
46 -
 47
47 -
 48
48 -
 49
49 -
 50
50 -
 51
51 -
 52
52 -
 53
53 -
 54
54 -
 55
55 -
 56
56 -
57
-
58
-
59
-
60
-
61
-
62
-
63
-
64
-
65
-
66
-
67
-
68
-
69
-
70
-
71
-
72
-
73
-
74
-
75
-
76
-
77
-
78
 |
 |

50
Setting Up the Machine and the Computer (Macintosh)
ENGLISH
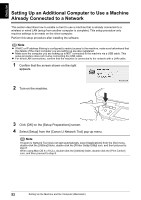
2
Connect the machine with a USB cable.
3
Turn on the machine.
4
Click [OK] on the [Setup Preparations] screen.
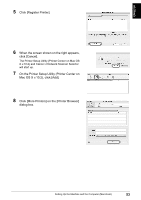
5
Select [Setup] from the [Canon IJ Network
Tool] pop-up menu, and click [Register
Printer].
6
Click [Cancel].
The Printer Setup Utility (Printer Center on Mac OS
X v.10.2) and Canon IJ Network Scanner Selector
will start up.
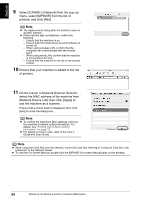
Note
If Canon IJ Network Tool does not start automatically,
select [Applications] from the [Go] menu, double-click
the [Utilities] folder, double-click the [Printer Setup
Utility] icon, and then proceed to step 7.
When using Mac OS X v.10.2.x, double-click the
[Utilities] folder, double-click the [Print Center] icon,
and then proceed to step 7.